Hosted Pages
ReachFive offers hosted pages to simplify the integration process for authenticating users and even for resetting and changing passwords. These pages are enabled via the ReachFive Console and help you get up and running in no time as they invoke the ReachFive SDK widgets natively. Just configure the Hosted Pages from your ReachFive Console. You can add a logo, favicon, and even configure a custom background colour to match your brand’s palette.
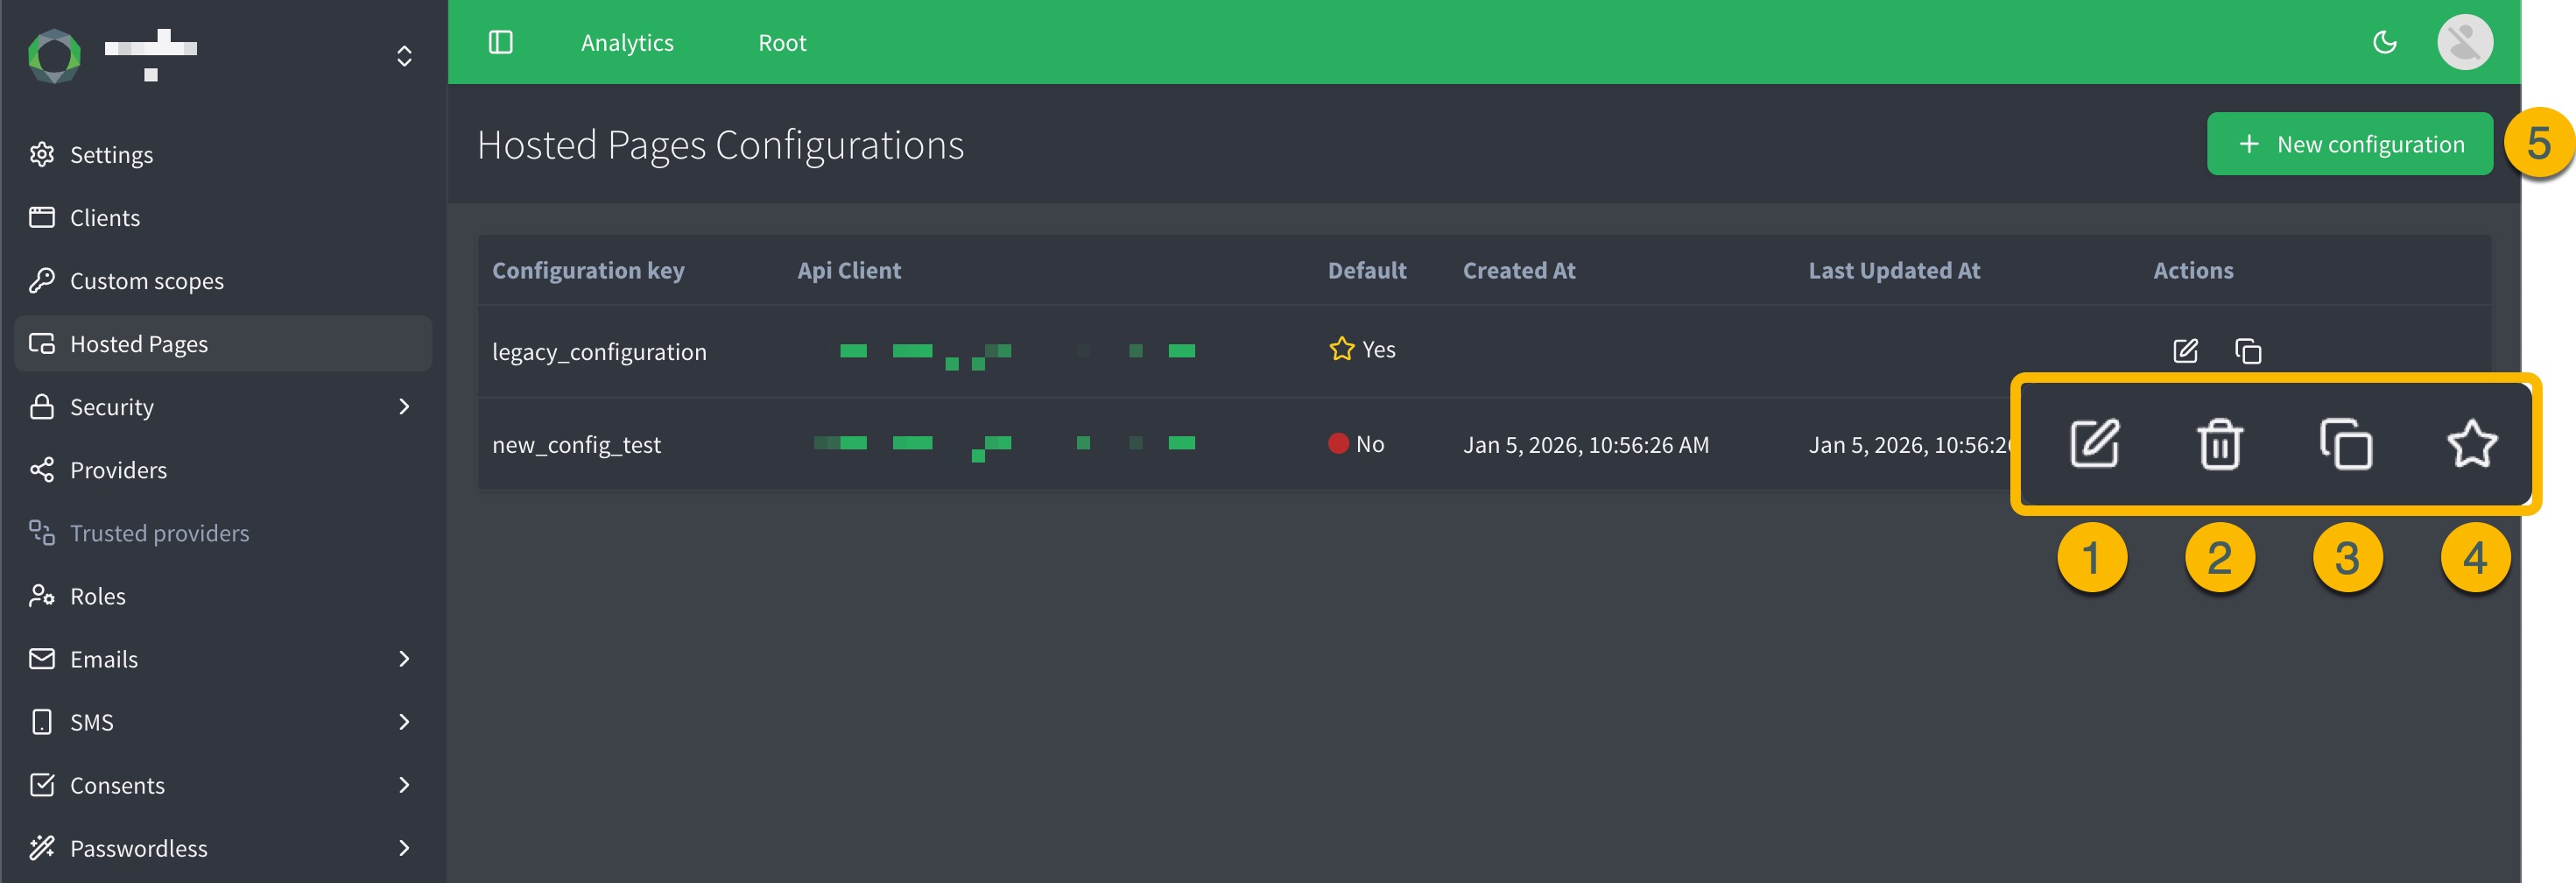
You can add multiple Hosted Pages sets to support different use cases, such as separate pages for different applications or environments (e.g., development, staging, production).
-
Edit the desired Hosted Pages set by clicking the pencil icon.
-
Delete a Hosted Pages set by clicking the trash icon.
-
Duplicate a Hosted Pages set by clicking the copy icon.
-
Set a Hosted Pages set as the default by clicking the star icon.
-
Create a new Hosted Pages set by clicking the New configuration button.
Prerequisites
-
You must have access to the ReachFive Console.
-
You must have at least a CRM User role.
-
You must whitelist your ReachFive account URL in the Allowed Origins (CORS) section of your First-party identity client.
-
You must whitelist your site’s authentication callback route URLs in the Allowed Callback URLs section of your First-party identity client.
| Check out the Clients page if you need help whitelisting the URLs. |
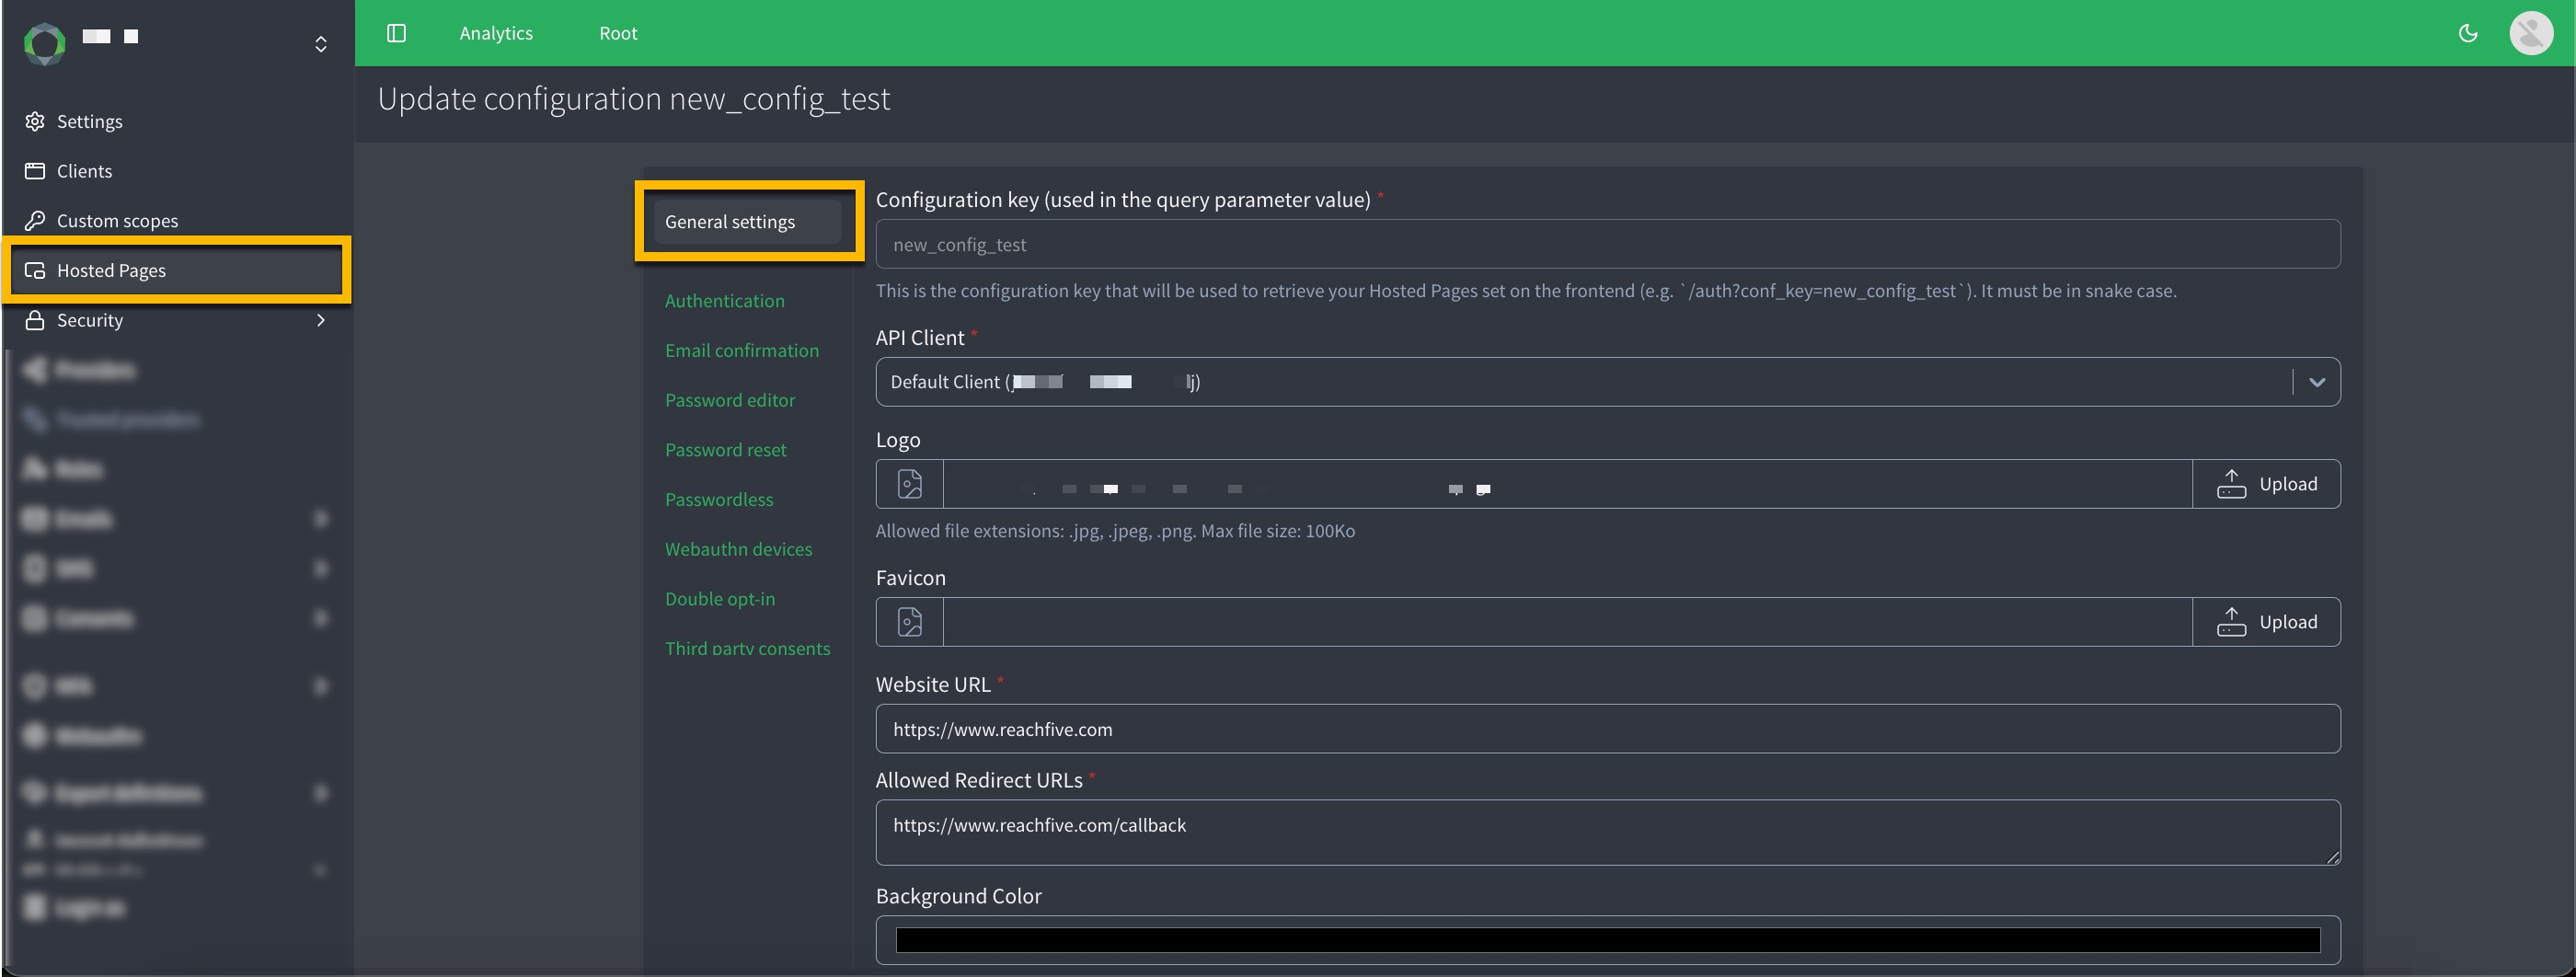
General settings
You must first configure the General settings for your Hosted Pages. These settings apply to all the hosted pages you enable.
-
Define your configuration key. The configuration key is used to retrieve your Hosted Pages set from the frontend. The configuration key must be in
snake_case. This key is added to the Hosted Page URL as a query parameter, for example:https://yourDomain/auth?conf_key=your_configuration_key. -
Select your First-party Identity client from the dropdown menu.
-
(Optional) Upload a logo to be displayed on your Hosted Pages.
-
(Optional) Upload a favicon to be displayed in the browser tab.
-
Add the Website URL. This is the target URL when users click on your logo.
-
Add your Allowed Redirect URLs. These URLs are used to redirect users after successful authentication or password operations. You can specify multiple valid URLs (one by line), starting with
http://orhttps://. -
(Optional) Choose a background color.
-
Don’t forget to Save your input.
Authentication HP
- Endpoint
-
/auth?conf_key=<configuration_key>
The Authentication Hosted Page makes use of the showAuth widget. This allows users to log in, sign up, and request a password reset email.
-
Ensure the Authentication page is enabled.
-
Specify the Redirect URI.
This is where the user is redirected after retrieving a successful access token and subsequent login/signup.
-
In the JSON config for widget, drop in the JSON content (descriptions) for configuring the authentication page like the example below.
{
  "socialProviders" : [ "facebook", "google" ],
  "theme" : {
    "primaryColor" : "#229955",
    "borderRadius" : "3",
    "socialButton" : {
      "inline" : true
    }
  },
  "initialScreen" : "signup",
  "allowLogin" : true,
  "allowForgotPassword" : true,
  "allowSignup" : true,
  "signupFields" : [ "birthdate", "email", "password", "custom_fields.sport_key", "consents.purple_paint",
    {
      "key": "consents.accept_confidential", (1)
      "defaultValue" : false, (2)
      "required" : true (3)
    }
  ],
  "recaptcha_enabled": true, (4)
  "recaptcha_site_key": <SITE_KEY>, (5)
  "captchaFoxEnabled": true, (6)
  "captchaFoxSiteKey": <SITE_KEY>, (7)
  "captchaFoxMode": "inline" (8)
}
1 If you want to use custom fields or consents as fields, you must declare the specific item by using a fullstop/period ( .) followed by the desired consent or custom field like so:custom_field.<custom_field_key>.2 You can require a defaultValuefor the field. Acceptstrueorfalse.3 You can require the signup field. Accepts trueorfalse.4 Set to trueto have reCAPTCHA enabled.5 Place the site key here. This site key comes from your Google reCAPTCHA setup. The site key must match the secret key from your reCAPTCHA setup that you used on your ReachFive account reCAPTCHA configuration.
1 Specifies if CaptchaFox is enabled or not. 2 Place the site key here. This comes from your CaptchaFox setup. 3 Specifies how the CaptchaFox is displayed. (hidden (default), inline, or popup) -
Add any desired custom styles in standard CSS format to the Custom styles area.
-
Add any desired custom scripts in standard JavaScript format to the Custom scripts area.
-
Don’t forget to Save your input.
-
Check it works at
<yourDomain>/auth?conf_key=<configuration_key>.
Email confirmation HP
- Endpoint
-
/email-confirmation?conf_key=<configuration_key>
The Email confirmation Hosted Page is where users are taken after clicking on the verification link sent in the confirmation email. You cannot currently configure it beyond enabling the page. However, there are some important notes to consider to successfully use this Hosted Page.
-
Enable the Email confirmation page.
-
Click Display a link to redirect to homepage if you want to display a link to redirect users back to the site’s home page after confirming.
-
Add any desired custom styles in standard CSS format to the Custom styles area.
-
Add any desired custom scripts in standard JavaScript format to the Custom scripts area.
-
Don’t forget to Save your input.
-
Check it works at
<yourDomain>/email-confirmation?conf_key=<configuration_key>.
- Inherited Global Settings
-
The Email confirmation Hosted Page inherits all of the General settings configured while setting up the Hosted Pages.
- Email Signup Template
-
To ensure that your users receive a confirmation email, make sure you have configured and saved the Email Signup Template which is configured at on your ReachFive Console.
- Whitelist the post-email confirmation URL
-
If you use
return_to_after_email_confirmationas a query parameter in your /auth signup flow to redirect users after email confirmation, you must ensure this is whitelisted under Allowed Redirect URLs found at .
Password editor HP
- Endpoint
-
/password-change?conf_key=<configuration_key>
The Password editor Hosted Page makes use of the showPasswordEditor widget. This allows users to edit their password.
To make sure users receive a password change/update email, make sure you have configured and saved the Password updated Template found at on the console.
This page is only accessible to authenticated users. We use the user’s Access Token for Hosted Page authentication. The Access Token is passed through a POST request via the access_token parameter. If no Access Token is granted, we use the Single Sign-on (SSO) session if it is enabled. If there is no Access Token or active SSO session, the authentication fails and the user cannot see the Hosted Page.
|
-
Go to the Password editor tab.
-
Ensure the Password editor page is enabled.
-
In the JSON config for widget, drop in the JSON content (descriptions) for configuring the Password editor page like the example below.
{ "promptOldPassword" : true, "theme" : { "primaryColor" : "#00bf48", "borderRadius" : "3", "socialButton" : { "inline" : true } } } -
Add any desired custom styles in standard CSS format to the Custom styles area.
-
Add any desired custom scripts in standard JavaScript format to the Custom scripts area.
-
Don’t forget to Save your input.
-
Check it works at
<yourDomain>/password-change?conf_key=<configuration_key>.
Password reset HP
- Endpoint
-
/password-reset?conf_key=<configuration_key>
The Password reset Hosted Page makes use of the showPasswordReset widget. This allows users to reset their password after receiving a password reset email.
To make sure users receive a password reset email, make sure you have configured and saved the Password reset Template found at on the console.
-
Go to the Password reset tab.
-
Ensure the Password reset page is enabled.
-
In the JSON config for widget, drop in the JSON content (descriptions) for configuring the Password reset page like the example below.
-
Add any desired custom styles in standard CSS format to the Custom styles area.
-
Add any desired custom scripts in standard JavaScript format to the Custom scripts area.
-
Don’t forget to Save your input.
-
Check it works at
<yourDomain>/password-reset?conf_key=<configuration_key>.
Passwordless HP
- Endpoint
-
/passwordless?conf_key=<configuration_key>
The Passwordless Hosted Page makes use of the showPasswordless widget. This allows users to login without their password.
To make sure users receive an email or SMS for passwordless login, make sure you have configured and saved the OTP - passwordless desired template (email or SMS) found at on the console.
-
Go to the Passwordless tab.
-
Ensure the Passwordless page is enabled.
-
In the JSON config for widget, drop in the JSON content (descriptions) for configuring the Passwordless page like the example below. This example shows passwordless using the email magic link template.
{
  "socialProviders" : [ "facebook", "google" ], (1)
  "theme" : {
    "primaryColor" : "#274890",
    "borderRadius" : "25",
    "socialButton" : {
      "inline" : true
    }
  },
  "recaptcha_enabled": true, (2)
  "recaptcha_site_key": <SITE_KEY>, (3)
  "captchaFoxEnabled": true, (4)
  "captchaFoxSiteKey": <SITE_KEY>, (5)
  "captchaFoxMode": "inline" (6)

}
1 If empty, no providers are displayed. If omitted, no providers are displayed. 2 Set to trueto have reCAPTCHA enabled.3 Place the site key here. This site key comes from your Google reCAPTCHA setup. The site key must match the secret key from your reCAPTCHA setup that you used on your ReachFive account reCAPTCHA configuration.
1 Specifies if CaptchaFox is enabled or not. 2 Place the site key here. This comes from your CaptchaFox setup. 3 Specifies how the CaptchaFox is displayed. (hidden (default), inline, or popup) -
Add any desired custom styles in standard CSS format to the Custom styles area.
-
Add any desired custom scripts in standard JavaScript format to the Custom scripts area.
-
Don’t forget to Save your input.
-
Check it works at
<yourDomain>/passwordless?conf_key=<configuration_key>.
Webauthn HP
- Endpoint
-
/webauthn-devices?conf_key=<configuration_key>
The Webauthn devices Hosted Page makes use of the showWebAuthnDevices widget. This allows users to manage their registered FIDO2 devices.
This page is only accessible to authenticated users. We use the user’s Access Token for Hosted Page authentication. The Access Token is passed through a POST request via the access_token parameter. If no Access Token is granted, we use the Single Sign-on (SSO) session if it is enabled. If there is no Access Token or active SSO session, the authentication fails and the user cannot see the Hosted Page.
|
-
Check the FIDO2 Prerequisites to enable FIDO2.
-
Go to the WebAuthn Devices tab.
-
Ensure the WebAuthn Devices page is enabled.
-
In the JSON config for widget, drop in the JSON content (descriptions) for configuring the WebAuthn Devices page like the example below.
{ "theme" : { "primaryColor" : "#274890" } } -
Add any desired custom styles in standard CSS format to the Custom styles area.
-
Add any desired custom scripts in standard JavaScript format to the Custom scripts area.
-
Don’t forget to Save your input.
-
Check it works at
<yourDomain>/webauthn-devices?conf_key=<configuration_key>.
Double opt-in HP
- Endpoint
-
/doi-consent-confirmation?conf_key=<configuration_key>
The Double opt-in (DOI) consent confirmation Hosted Page is where users are taken after clicking on the Double opt-in consent link sent with the DOI consent template. You cannot currently configure it beyond enabling the page.
-
Enable the Double opt-in consent confirmation page.
-
Add any desired custom styles in standard CSS format to the Custom styles area.
-
Add any desired custom scripts in standard JavaScript format to the Custom scripts area.
-
Check it works at
<yourDomain>/doi-consent-confirmation?conf_key=<configuration_key>.
For more details, see Double opt-in consents and DOI consent templates.
Consents HP
- Endpoint
-
/consent?conf_key=<configuration_key>
The Third party consents Hosted Page is where users decide on the consents they wish to give to third parties. You can customise the text displayed on this Hosted Page.
-
In the ReachFive Console, go to .

-
Add the desired text in the Content of the consent page text area.
-
Specify the Accept button text.
-
Specify the Decline button text.
-
Add any desired custom styles in standard CSS format to the Custom styles area.
Click See default styles to view the default styling for the Hosted Page and its widgets. This can serve as a base for your custom styles.
-
Add any desired custom scripts in standard JavaScript format to the Custom scripts area.
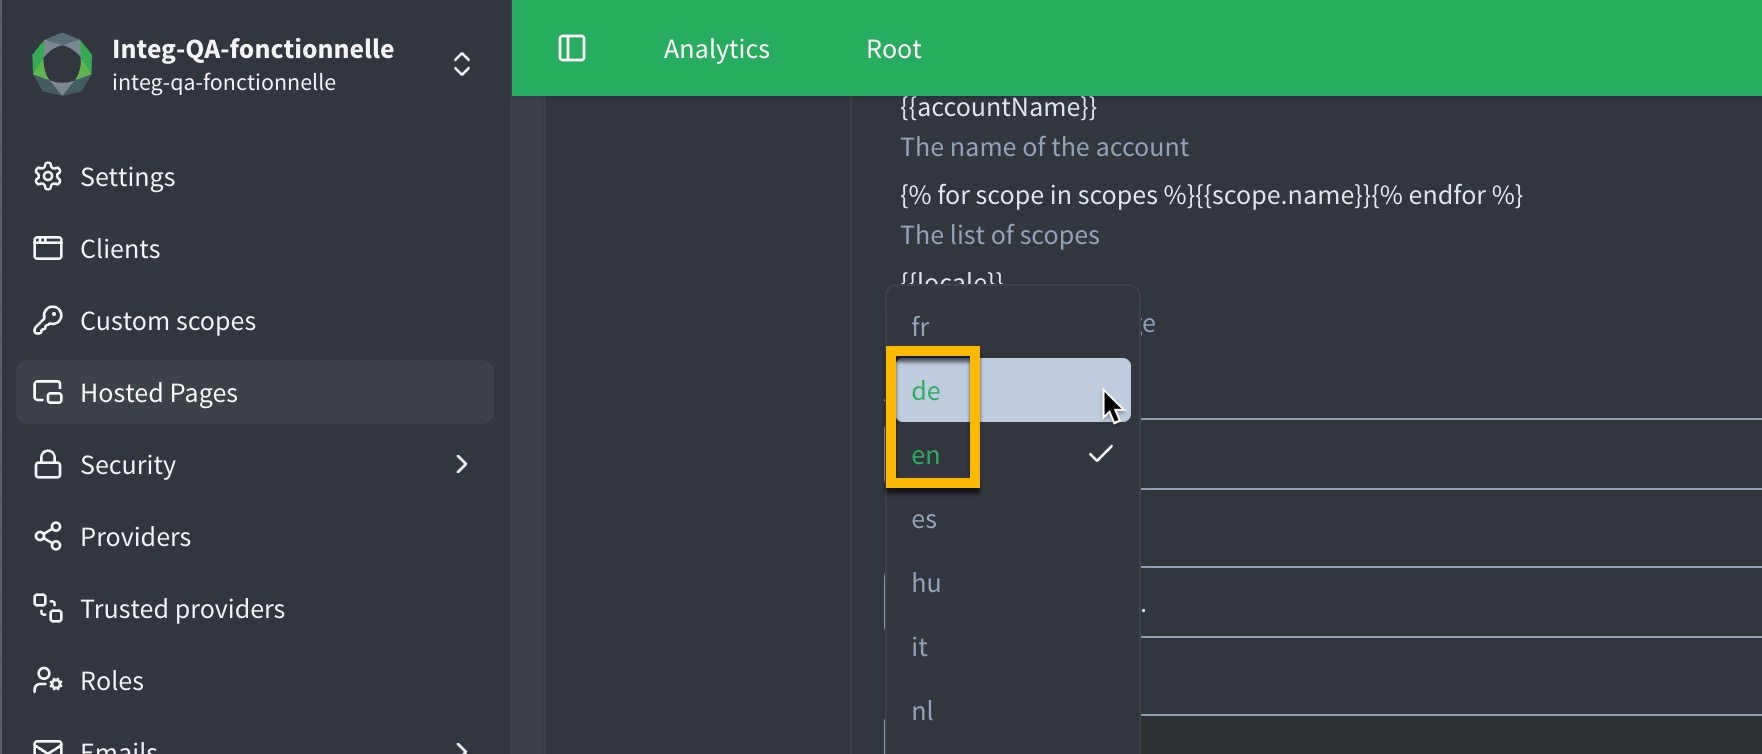
For the Accept and Decline button texts, all supported languages are available for localisation. When added, the language code (e.g., En for English, Fr for French) turns green to the signal a customisation has been added.
Profile management HP
- Endpoint
-
/profile-management?conf_key=<configuration_key>
The Profile management Hosted Page is a control center that allows you to configure multiple UI SDK widgets on a single page.
-
Go to in your ReachFive Console.
-
Go to the Profile management tab.
-
Enable the Profile management page.
-
Toggle on your desired widgets.
-
Define the Title for the widget.
-
In the JSON config for widget, input the configuration object required by the widget.
This configuration must match the schema expected by the corresponding SDK method (see UI SDK documentation).
Example: Configuring a Profile Editor widget{ "fields": [ "given_name", "family_name", "phone_number", "custom_fields.marketing_opt_in" ], "theme": { "primaryColor": "#462299", "borderRadius": "5" } } -
(Optional) Define custom styles in standard CSS format in the Custom styles area.
Click See default styles to view the default styling for the Hosted Page and its widgets. This can serve as a base for your custom styles.
-
(Optional) Define custom scripts in standard JavaScript format in the Custom scripts area.
-
Repeat the steps above to add and configure additional widgets as needed.
-
Don’t forget to Save your input.
-
Verify your configuration by visiting
<yourDomain>/profile-management?conf_key=<configuration_key>.
JSON field descriptions
| Parameter | Description | ||||||||
|---|---|---|---|---|---|---|---|---|---|
Boolean that specifies if the forgot password option is enabled.
|
|||||||||
Boolean that specifies whether login is enabled. Defaults to |
|||||||||
Boolean that specifies whether signup is enabled. Defaults to |
|||||||||
Widget labels and error messages to override. If specified, these labels and error messages override the default message regardless of the language. If unspecified, ReachFive falls back to the default wordings in every supported language.
|
|||||||||
The widget’s initial screen. See |
|||||||||
The URL to which the user is redirected after a password reset. |
|||||||||
Ask for the old password before entering a new one. Defaults to |
|||||||||
List of the signup fields to display in the form. Defaults to A field is either a You can pass a field as an object to override default values:
|
|||||||||
Lists the available social providers. This is an array of strings. If you pass an empty array, social providers are not displayed. If You can also specify variants for a provider as a key:value pair:
|
|||||||||
The options to set up to customize the appearance of the widget. Below is an example of some of the theme attributes.
|
|||||||||
Boolean that specifies whether reCAPTCHA is enabled or not. |
|||||||||
Boolean that specifies whether the CaptchaFox is enabled or not. |
|||||||||
The CaptchaFox site key that comes from your CaptchaFox setup. |
|||||||||
Specifies how CaptchaFox is displayed.
|
|||||||||
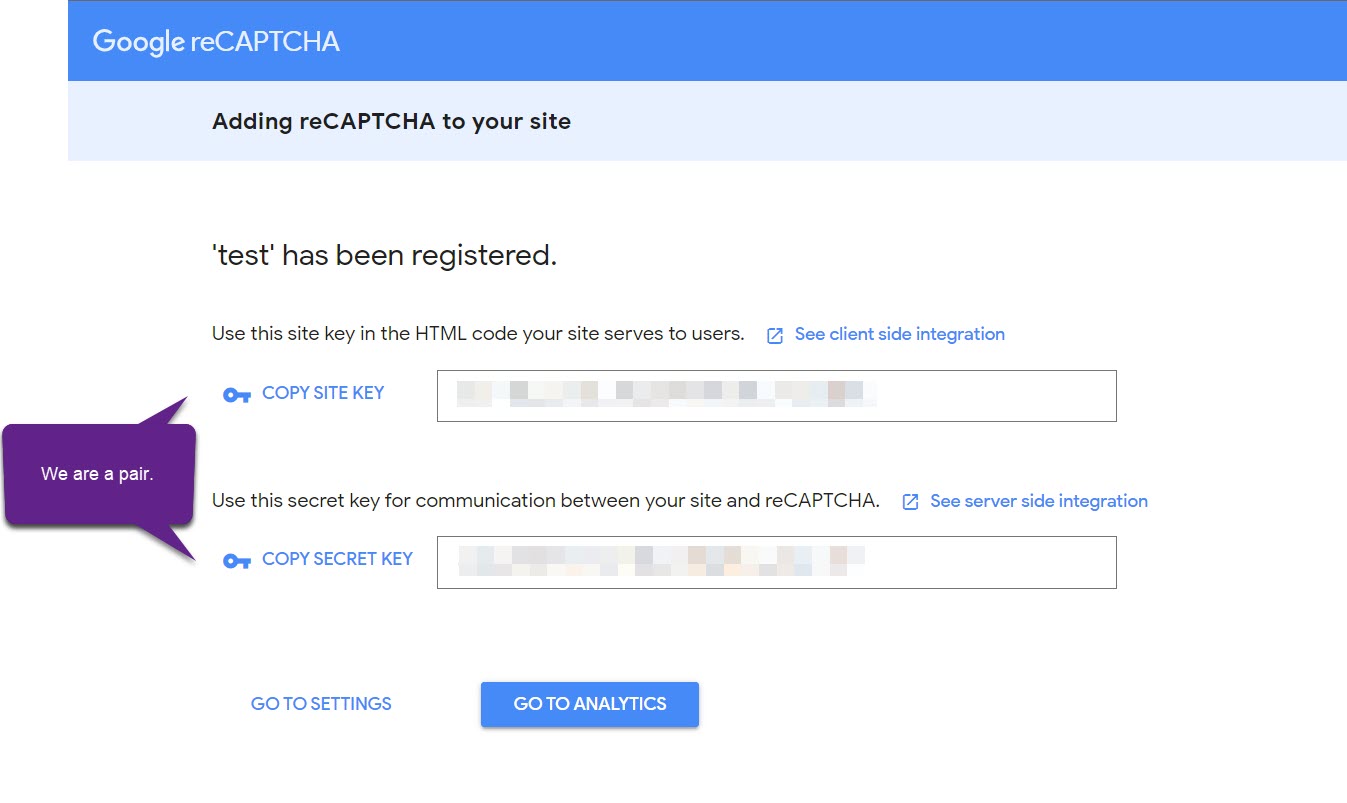
The SITE key that comes from your reCAPTCHA setup. This must be paired with the appropriate secret key that you received when setting up reCAPTCHA. |
reCAPTCHA v3
reCAPTCHA is a free service offered by Google that helps to block automated attempts to log in with user accounts and most importantly, protects your site from abuse. reCAPTCHA v3 uses advanced risk analysis to determine if the attempt is human or bot. With this version, there is no need for user interaction like there was in v2.
| Check out the reCAPTCHA version differences here. |
You can quickly integrate reCAPTCHA with ReachFive’s Hosted Pages integration option by dropping in a couple of fields in the Hosted Pages JSON widget.
|
You must have You can enable reCAPTCHA directly from the ReachFive Console. Check out how to Enable reCAPTCHA directly from the ReachFive Console. Currently, this is only available to the Authentication and Passwordless Hosted Pages. |
Add reCAPTCHA to JSON widget
...
    "recaptcha_enabled": true, (1)
    "recaptcha_site_key": SITE_KEY (2)
...| 1 | Set to true to have reCAPTCHA enabled. |
| 2 | Place the site key here. This site key comes from your Google reCAPTCHA setup.
You must use the
|
Custom styles for Hosted Pages
Each Hosted Page offers two ways to control appearance:
| Mechanism | Purpose |
|---|---|
JSON config for widget |
Use the |
Custom styles field |
CSS for the Hosted Page HTML around the widget, page-specific layouts, and widget overrides that |
Custom styles load after the default Hosted Pages stylesheet.
To add custom CSS:
-
Go to your desired Hosted Page in the ReachFive Console at .
-
Enter CSS in the Custom styles area.
-
Don’t forget to Save your input.
Configure the widget with theme
Put widget appearance in the JSON config for widget, not in custom CSS, whenever possible.
{
  "theme": { (1)
    "primaryColor": "#229955",
    "borderRadius": "3",
    "input": {
      "borderColor": "#ced4da"
    },
    "socialButton": {
      "inline": true
    }
  }
}| 1 | The theme object supports base, link, input, button, socialButton, and passwordStrengthValidator attribute groups.
It applies to the widget the SDK renders inside the page; for example, the login form on the Authentication Hosted Page. |
Full attribute list: theme attributes.
Custom styles
Use custom CSS for the following only.
Hosted Page layout
ReachFive provides the shell around the widget. Custom CSS adjusts that shell:
-
.content,.logo,.widget: page margins, logo, and the outer white card on single-widget pages -
.redirectionLink: the back/home link below the widget -
html,body: full-page background (also configurable in Hosted Pages general settings)
Page-specific layouts
Some Hosted Pages have layout classes intended for custom CSS:
-
Profile management — arrange widget sections in a grid. Click See default styles in the ReachFive Console and start from classes such as
.profile-management .widgetsand.profile-management .widget.profileEditor. -
Third party consents — style the consent page content and buttons. Click See default styles for classes such as
.consentsButtons.
Widget overrides theme cannot do
When the theme attributes do not cover your need, use custom CSS scoped to .r5-widget.
The SDK mounts into #widget-container (single-widget pages) or #profileEditor-container and similar IDs (Profile management).
It then renders a child element with the class r5-widget; expand the mount point in DevTools to find it.
.r5-widget .r5-social-buttons button {
  outline: 1px solid red;
  background-color: black;
}
Some stable SDK classes you can target under .r5-widget:
-
.r5-social-buttons -
.r5-btn-social -
.r5-webauthn-devices
What to avoid
-
Do not use custom CSS for options already in
themeWhy Use
primaryColor,input.borderColor,borderRadius,button,socialButton, and otherthemeattributes instead. -
Do not target
sc-*class names (for example,.sc-aXZVg)Why Hashed classes generated by styled-components at build time. They change between SDK releases and are being replaced by Tailwind.
-
Do not use broad selectors on the widget mount point
Why Rules such as
#widget-container divor#widget-container formwith!importanthit every element inside the widget and cause unpredictable results. -
Do not assume
#widget-containeris the widgetWhy It is an empty mount point in the HTML. The SDK renders the widget inside it.
#widget-container div { (1)
  border-color: transparent !important;
}| 1 | This pattern hides borders on password, password_confirmation, and phone_number (with country picker) because those fields draw their border on a wrapper <div>, not on the <input>.
Use theme.input.borderColor instead. |
|
The UI SDK widget is updated regularly.
The HTML structure inside When you use custom CSS on the widget, prefer the JSON Retest your Hosted Pages custom styles after each UI SDK upgrade. |
Custom scripts for Hosted Pages
Leverage available callback events to trigger your JavaScript code at specific points in the user journey.
The available events are OnError, OnReady, and OnSuccess, which provide flexibility in how and when your scripts are executed.
To add custom JavaScript to your Hosted Page:
-
Go to your desired Hosted Page in the ReachFive Console at .
-
Scroll to Custom scripts on the page configuration screen.
-
Enter your JavaScript code in the Custom scripts area.
Exampleconst translations = { fr: { title: "Disclamer", description: "Lorem ipsum dolor sit amet", } }; const locale = new Intl.Locale(navigator.language); const disclamer = document.createElement('div'); disclamer.className = "disclamer"; disclamerTitle = document.createElement('h3'); disclamerTitle.innerHTML = translations[locale.language].title; disclamer.appendChild(disclamerTitle); disclamerDescription = document.createElement('p'); disclamerDescription.innerHTML = translations[locale.language].description; disclamer.appendChild(disclamerDescription); onReady(() => { (1) document.querySelector('.widget').appendChild(disclamer); })1 This ensures the script runs once the page is fully loaded and ready. You can also leverage onErrorandonSuccessevents to trigger your JavaScript code at specific points in the user journey, such as after a successful form submission or when an error occurs.