Multi-factor Authentication
Multi-factor Authentication (MFA) is an authentication method that requires users to provide two or more verification factors to gain access to a resource. Enabling MFA on your site with ReachFive ensures your users must verify their login with a second factor (sms code, email link, etc.).
Prerequisites
In order to use MFA, you must have the following features enabled and configured on your account:
Using phone numbers for MFA
The SMS feature is not required for MFA. However, if the feature is not enabled, a few conditions apply.
If you only use email as the second factor, there is no need for the SMS feature.
You can also use phone_number as the second factor without SMS enabled.
However, in this case, some conditions apply:
-
Phone number verification: When the SMS feature is disabled,
phone_number_verifiedis alwaysfalse, even if the same number is used as an MFA credential. -
SMS provider configuration: You can configure an SMS provider, but templates unrelated to Passwordless or MFA remain disabled.
-
Independent MFA credentials:
-
Updating a
phone_numberdoes not update the associated MFA credential. -
Adding a
phone_numberas a credential does not automatically mark it as verified.
-
Registering verified identifiers in the MFA flow
When a user attempts to register an MFA credential using an identifier (such as an email address or mobile number) that is already verified on their account, no additional verification code is sent for that identifier.
This applies to both email (no new email code/link) and mobile numbers (no new SMS code). The system recognizes the identifier as trusted and completes the registration without requiring further verification.
|
Users must register at least one MFA credential before the prompts apply to their account.
Encourage administrators to guide users through re-registering MFA whenever they change identifiers because updating the profile |
MFA settings
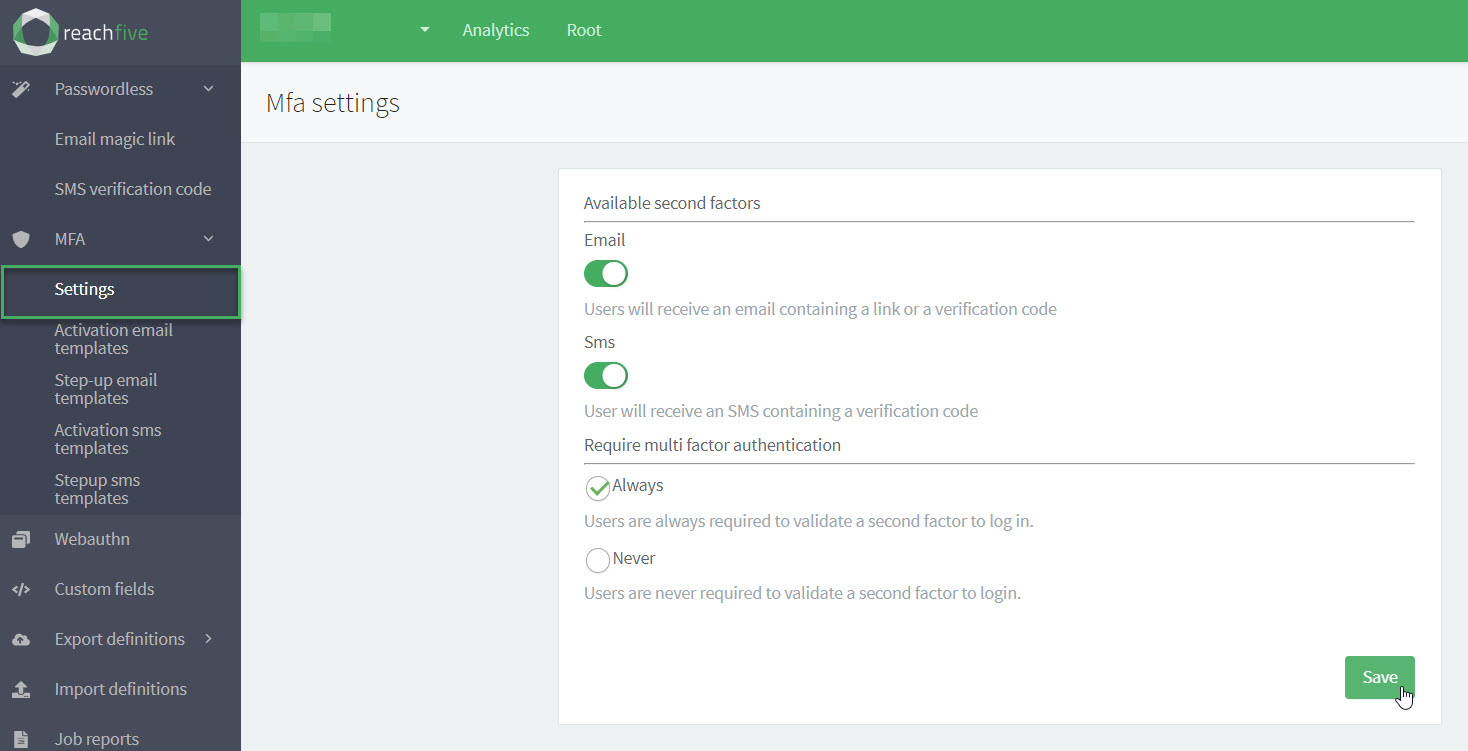
You can manage your MFA settings directly in the ReachFive Console.
Enable second factors for MFA
You can enable both email and SMS (or just one) as a second factor for your users to use in the MFA/stepup flow.
-
Email = This means that you users can use their email as the second factor in the MFA flow (and will receive an email with the link or verification code as part of that flow).
-
SMS = This means that you users can use their mobile as the second factor in the MFA flow (and will receive an SMS with the verification code as part of that flow).
To enable the second factors:
-
From your ReachFive Console, go to .
-
Toggle the second factor that you would like to enable.
-
Don’t forget to Save your input.
Set MFA session duration
You can now configure how long the MFA AMR scope remains valid in the MFA settings section of the ReachFive Console.
-
From your ReachFive Console, go to .
-
Set the session lifetime anywhere between 1-720 hours (default: 72 hours).
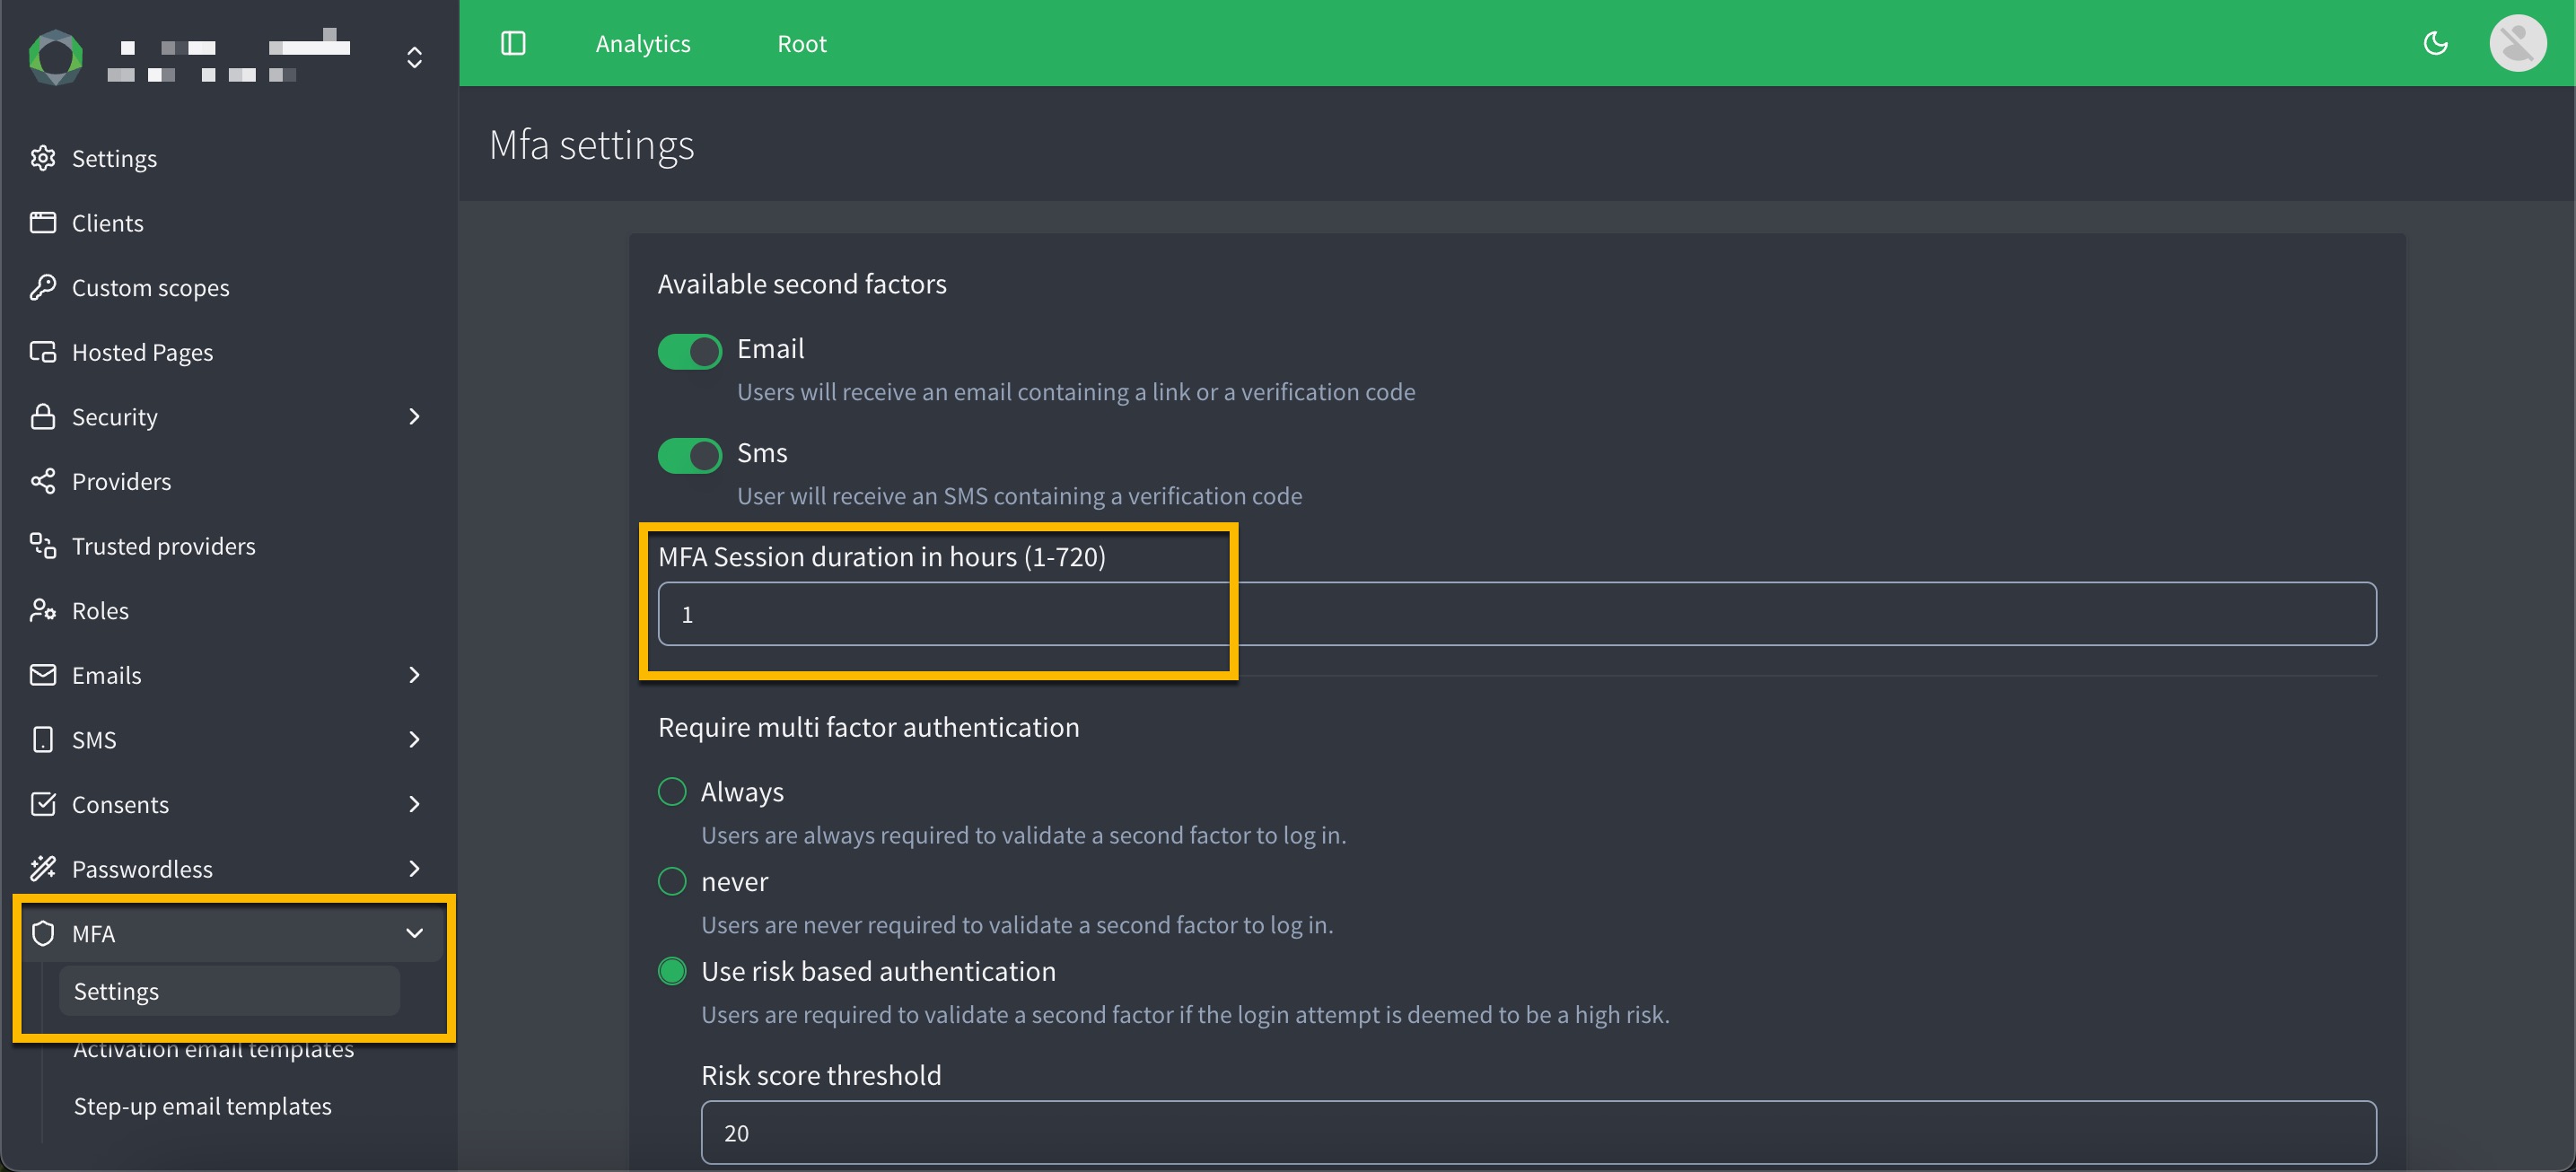
-
Don’t forget to Save your input.
A user who completes MFA on Monday at 09:32 can access MFA-protected features until Thursday at 09:32 (72 hours), even if their SSO session remains active for other tasks. If they perform MFA again within that period (e.g., during a step-up), the MFA validity resets — for example, to Saturday at 17:12 if triggered on Wednesday at 17:12.
This feature helps reduce hijacking risk, supports compliance requirements, and gives you flexibility to balance security with convenience.
Require MFA for login
It’s possible to enforce MFA all the time for the login flow if desired for users with a registered second factor MFA credential.
| This is only enforced when users have a registered second factor credential for MFA. If they do not have a credential registered, then the stepup is not required for that user to log in. |
| Option | Notes |
|---|---|
|
Users are always required to validate a second factor to log in. |
|
Users are never required to validate a second factor to log in. |
To set the requirements for logging in:
-
From your ReachFive Console, go to .
-
Choose Always or Never.
-
Don’t forget to Save your input.
|
Users encounter MFA on every login when the policy is set to The MFA If a user does not receive a verification code, they can retry with the same |
Stepup authentication
Stepup authentication is a little different than traditional MFA, but it offers a balance between unnecessary friction in the user experience and enhanced security when accessing sensitive information.
| You must have MFA enabled on your ReachFive Console to use Stepup authentication. |
Subsections:
Stepup authentication is best used for specific actions such as:
-
Paying with a credit card
-
Changing personal account details
-
Adding authentication information
-
Logging in from a new device or location
These are just examples and don’t represent all possible times you might use Stepup authentication.
MFA flow with Stepup authentication
When a user is already logged in, but they want to access something secure or perform a sensitive action (like purchasing a product), you can configure the Stepup authentication flow. See the accompanying MFA flow table to follow along with the flowchart.
| The flow below assumes the user has already signed up to your site. |
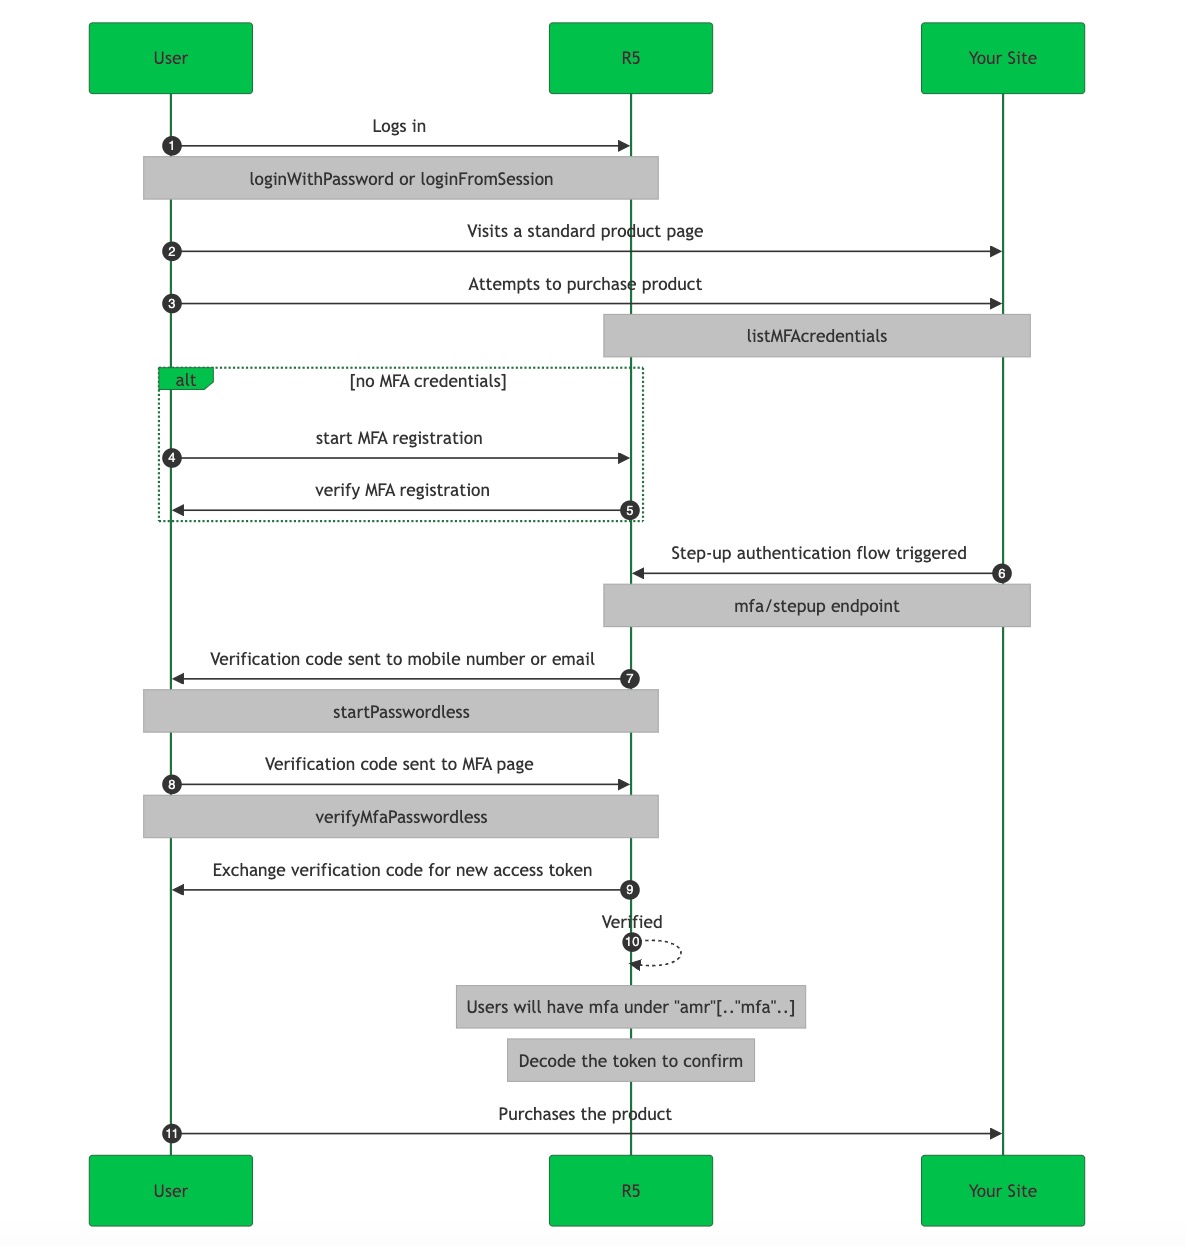
| Step | Core JS SDK method | API operation | Notes | ||
|---|---|---|---|---|---|
1 |
User logs into the site.
|
||||
2 |
User browses the site; visits a product page. |
||||
3 |
Ensures the user has MFA credentials and has completed the registration process.
|
||||
4 |
Registers the user’s phone number for use as an MFA credential (second factor). You can also choose to trust a device while registering so long as the device is verified through this flow.
|
||||
5 |
Verifies the user’s phone number for use as an MFA credential (second factor). You can also choose to trust a device while registering so long as the device is verified through this flow.
|
||||
6 |
Initiates the stepup flow. |
||||
7 |
Starts the passwordless MFA flow using the
|
||||
8 |
Verifies the passwordless flow for MFA with the user verification code and |
||||
9 |
Exchanges the authorization code for a new access token. |
||||
10 |
Confirms |
||||
11 |
Product purchased. |
Using the stepup endpoint
When you use the stepup endpoint to initiate the stepup flow, you can start the flow in one of three ways.
| See the table below for accompanying details to the flowchart. |

| Approach | Description | ||||
|---|---|---|---|---|---|
SSO session cookie Recommended |
Using a current, active SSO cookie initiates the With the SSO session cookie, the cookie is deposited by the SDK into the browser. This way, it can’t be leaked or used on another domain.
|
||||
Recommended |
Passing a valid |
||||
|
Passing the
|
Retry MFA step-up
In some cases, a user may not receive the MFA verification code (for example, due to SMS or email delivery issues).
To improve the user experience, the step_up token issued during the step-up flow can now be reused to request a new code.
This allows integrators to implement a retry process without forcing users to repeat the full login or step-up flow.
The verification code requests in the MFA flow are subject to a limit. As soon as a new verification code is generated, the previous code becomes invalid. This limit helps protect against abuse and can be configured by ReachFive administrators. If you’d like details on the limit or to adjust this setting, contact your ReachFive representative.

| Step | Action | Notes | ||
|---|---|---|---|---|
1 |
Trigger step-up |
Call |
||
2 |
Start passwordless MFA |
Call |
||
3 |
Code not received? |
If the user doesn’t receive the code, call
|
||
4 |
Verify MFA |
Once the user receives the code, call |
MFA user experience
By enabling MFA with ReachFive on your site, you can provide a secure, frictionless user experience.
A typical user journey is when Stepup authentication is configured so that MFA is only required during sensitive actions like making a purchase or changing personal details, similar to the video below.
| You can configure a template that is sent to users like in this experience on the ReachFive Console. |