Risk-based Authentication
Risk-based Authentication, also known as RBA, offers a holistic approach to user authentication that provides a more frictionless experience for users while ensuring security and peace-of-mind from a site perspective.
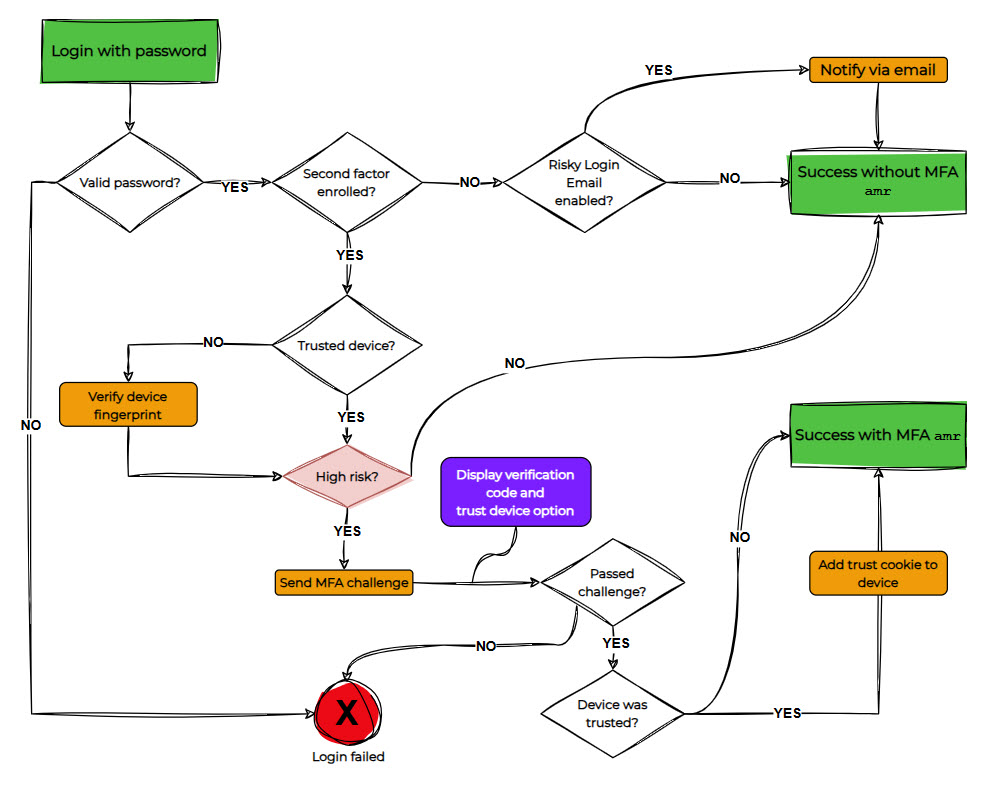
RBA uses a risk calculation to develop a device profile, sometimes referred to as a fingerprint, so that future login attempts are compared against this fingerprint in order to determine the path to authentication, whether that means immediate authentication or perhaps a stepup may be required if it’s determined that the login attempt deviates too far from the device profile.
Current features
-
Trust a device
-
View trusted devices
-
Remove trusted devices
-
Configure risk score threshold (the threshold at which a login attempt is considered risky)
-
Send risky login notifications (email and SMS templates available)
Important concepts
The following should be considered when using RBA:
-
To get the RBA feature, you’ll need to request it directly with your Professional Services representative so they can enable it on your account.
-
Only users who have MFA activated can add trusted devices to their profile.
-
The feature does not work with the ROPC flow.
See disabling the ROPC flow for a client for more details on how to do that. -
Trusted devices are stored for 90 days.
-
Devices using the
magic_linkas a second factor can’t be added to the trust devices list. -
Returning users on a device with the trusted-device cookie experience a seamless single-step login. They keep sessions frictionless for up to the configured lifetime (default 90 days) without extra prompts.
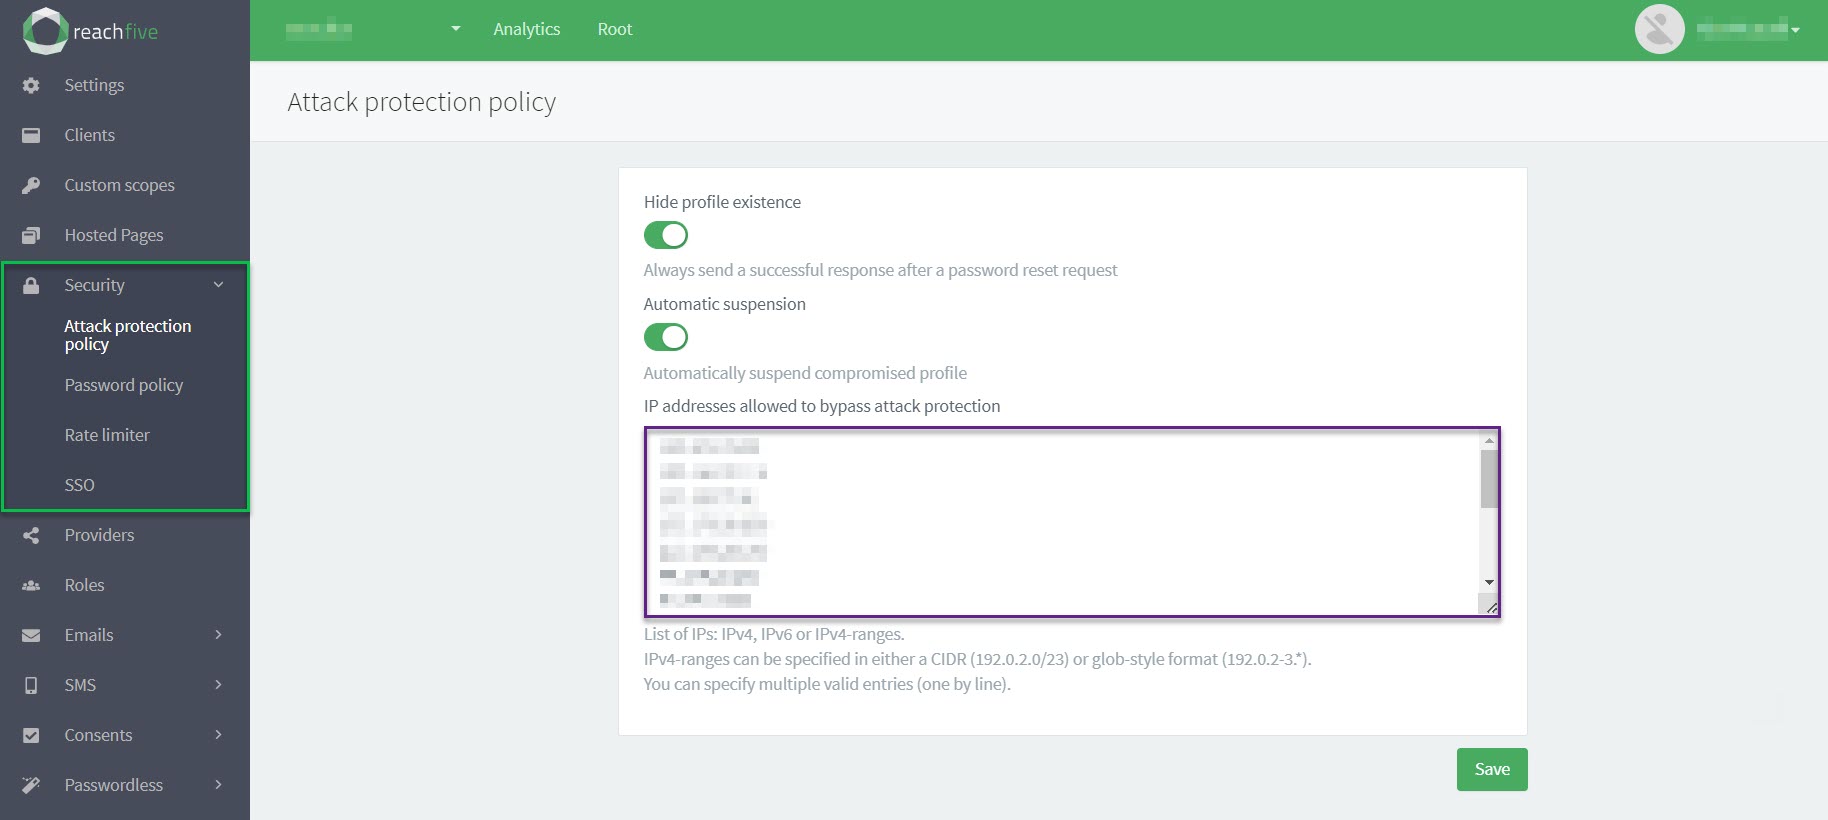
Whitelist IPs
You can whitelist certain IP addresses with for Risk-based Authentication directly from the ReachFive Console.
| Whitelisted IP addresses will bypass the attack protection policy. Proceed with caution. |
Prerequisites
-
You must have access to the ReachFive Console.
-
You must have a CRM, Manager, or Administrator role.
-
You must have the IP Blocking feature enabled.
-
You must have the Compromised profiles feature enabled.
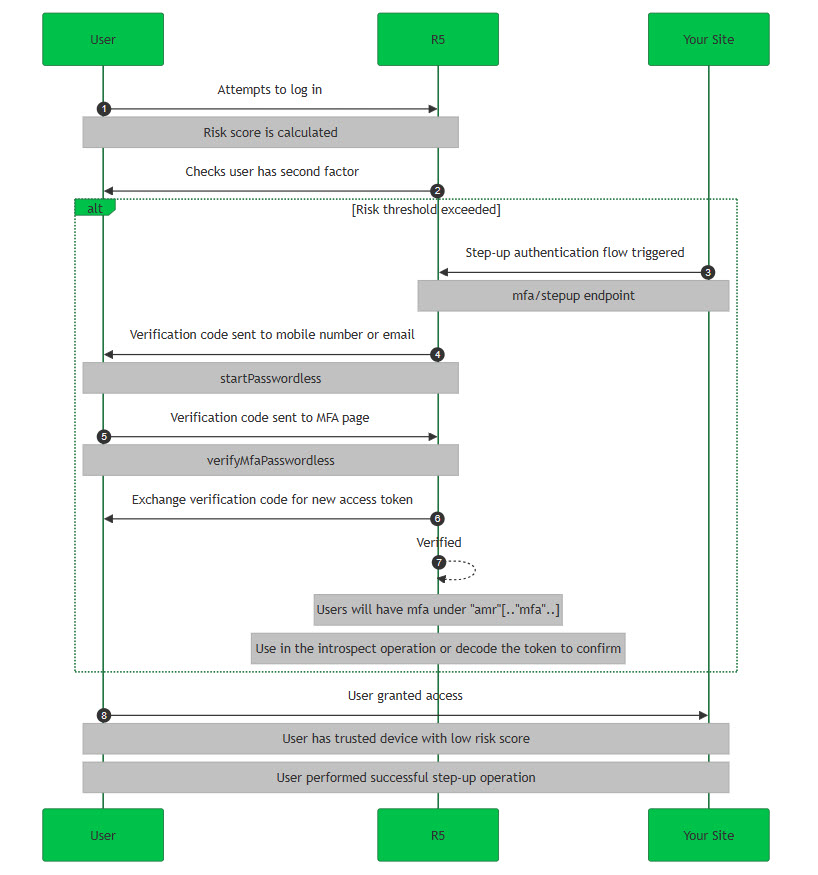
RBA method and operation flow
When RBA is enabled with your account, it enhances your security by ensuring that only valid users are granted access. The flow here guides you through the methods and API operations needed to achieve that.
| Step | Core JS SDK method | API operation | Notes | ||
|---|---|---|---|---|---|
1 |
User attempts to log into the site. If successful, the step up token is delivered in the
|
||||
2 |
Checks user has a second factor (MFA enabled).
|
||||
3 |
Initiates the stepup flow.
|
||||
4 |
Starts the passwordless flow for MFA using the
|
||||
5 |
Verifies the passwordless flow for MFA with the user verification code and
The When users finish a step-up they can opt to “trust this device,” which stores the |
||||
6 |
Exchanges the authorization code for a new access token. |
||||
7 |
Confirms |
||||
8 |
User granted access. |
Retry MFA step-up
In some cases, a user may not receive the MFA verification code (for example, due to SMS or email delivery issues).
To improve the user experience, the step_up token issued during the step-up flow can now be reused to request a new code.
This allows integrators to implement a retry process without forcing users to repeat the full login or step-up flow.
The verification code requests in the MFA flow are subject to a limit. As soon as a new verification code is generated, the previous code becomes invalid. This limit helps protect against abuse and can be configured by ReachFive administrators. If you’d like details on the limit or to adjust this setting, contact your ReachFive representative.

| Step | Action | Notes | ||
|---|---|---|---|---|
1 |
Trigger step-up |
Call |
||
2 |
Start passwordless MFA |
Call |
||
3 |
Code not received? |
If the user doesn’t receive the code, call
|
||
4 |
Verify MFA |
Once the user receives the code, call |
Enable RBA
Enabling Risk-based Authentication through the ReachFive Console ensures that only the devices that your users have decided to trust will be allowed to login without a second step.
Prerequisites
-
You must have access to the ReachFive Console.
-
You must have a Developer, Manager, or Administrator role.
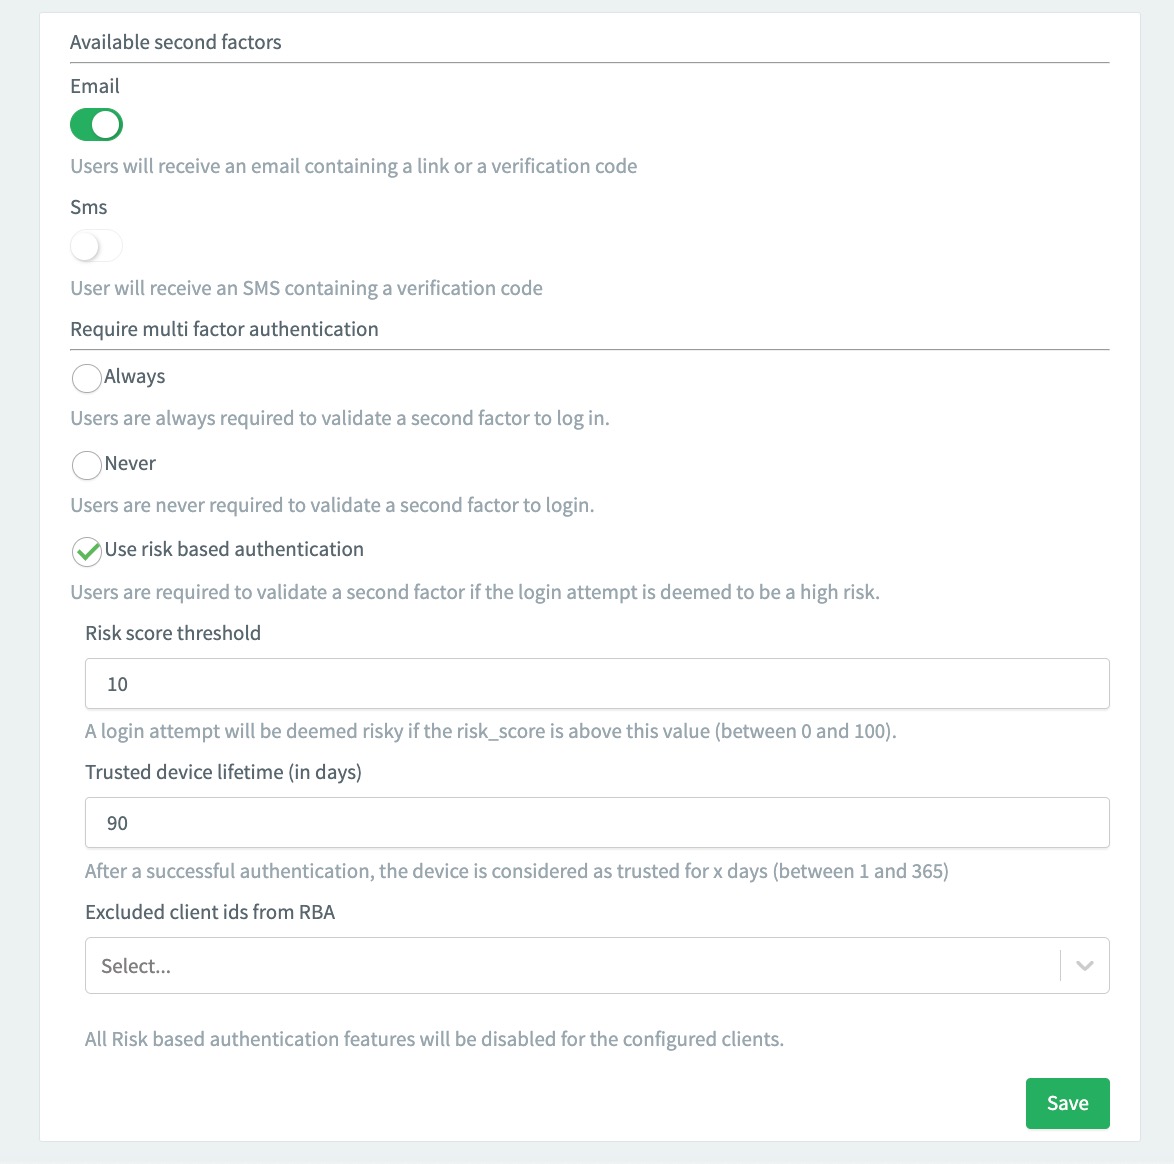
Instructions
-
Log in to your ReachFive Console.
-
Go to .
-
Enable Use risk based authentication.
-
If desired, configure the Risk score threshold.
What is that? 🤔This is the threshold at which a login attempt is considered risky.
The default is
30and it ranges from0(consider all login attempts risky) to100(consider no login attempts risky). -
Optional If desired, configure the lifetime of the trusted device.
The default is
90days. Choose a value between1and365. -
Optional If needed, choose which of your clients you want to exclude from RBA protections.
-
Don’t forget to Save your input.
RBA templates
You can send notifications to users about risky logins via our handy email and SMS templates. As part of those, you can even pass information about the particular user and device using the templating variables as shown here.
Risky Login Notification
Sent to user when login attempt is deemed risky
This template should be used to notify users that a login attempt from their account is considered unusual or risky. For users that haven’t enrolled any identifiers for MFA, the email is sent every time a user attempts to log in.
You can use the {{link}} templating variable in the email template to redirect users to a password reset page.
This is useful when the login attempt is not from the user and the user wants to quickly reset their password.
-
Enable the template.
-
Enter the sender’s email in the From field.
-
Write your Subject.
Unusual login attempt -
Enter the URL to redirect users in the Redirect to field.
-
Specify the URL lifetime (in seconds).
-
Write your Message for the template.
<p>Hello {{user.given_name}},</p> <p>We have detected a new connection from this user agent {{user_agent}} and this operating system {{operating_system}}.</p> <p>If this is you, no action is required; otherwise we recommend you change your password by following <a href="{{link}}">this link</a>.</p> -
Don’t forget to Save your input.
If you have configured a custom provider, your templates will be different and only contain the following fields:
| Field | Description |
|---|---|
Enabled |
Checkbox to enable the template.
|
Template ID |
The ID that you assign to the template.
|
Redirect to |
The URL to which you want to redirect the user.
|
URL Lifetime (seconds) |
The URL lifetime in seconds.
|

Risky Login Notification
Sent to user when login attempt is deemed risky
This template should be used to notify users that a login attempt from their account is considered unusual or risky. For users that haven’t activated Multi-factor Authentication with Risk-based Authentication, the SMS is sent every time a user attempts to log in.
-
Go to on your ReachFive Console.
-
Toggle to the Risky Login Notification tab.
-
Enable the template by ticking the Enabled checkbox.
-
Enter the Verification Code Lifetime. This is in seconds.
-
Use the Message section to write your customised template like the example below:
Hi {{user.given_name}}. There has been an unusual login attempt on your account. Please contact your system administrator if this was not you trying to sign in. Otherwise, you can ignore this message. -
Don’t forget to Save your input.
If you have configured a custom provider, your templates will be different and only contain the following fields:
| Field | Description |
|---|---|
Enabled |
Checkbox to enable the template.
|
Template ID |
The ID that you assign to the template.
|
Code Lifetime (seconds) |
The code lifetime in seconds.
|
RBA API endpoints
If a user has an MFA second factor device associated with their account, they can manage their trusted devices. The following endpoints allow you to perform the add and remove operations:
- Identity API
-
-
Delete Remove trusted devices
- Management API
-
-
Delete Remove trusted devices