Clients
ReachFive is based on OAuth 2.0 and OpenID protocols. These protocols rely on clients and their credentials to operate. Clients must have both a client ID and a client secret.
| See the Glossary below for help with understanding the terms a bit more. |
ReachFive provides both an Identity API and Management API for authenticating and managing users.
We recommend that you create new clients for every use case such as for a desktop application or mobile application.
Client types
There are three client types that you should understand when using your ReachFive solution:
First-party identity clients
First-party identity clients are owned and controlled by the same organisation who owns the ReachFive domain. This is typically your own application for your company.
You can disable the ROPC flow directly from the ReachFive Console so that the grant_type of password is unable to be used on First-party Identity clients. We offer this ability to disable the flow, because we do not recommend this flow especially for public clients.
|
Third-party identity clients
Third-party identity clients are owned and controlled by an organisation other than your own and that should not have admin access to your ReachFive domain. Third-party applications allow external parties to access protected resources from their API.
You integrate with the fictional social media platform, ChatAway. In this case, your application is the third party application using the ChatAway API to retrieve user information.
| Third-party applications must get user consent when consuming third party APIs. The consent that you are requesting is defined in the scopes section of your Third-party identity client. See Set up a client for help with that. |
Management clients
Management clients manage users. With the management client, you are not directly authenticating users, but instead managing users by doing things such as:
-
Searching users
-
Updating users
-
Suspending user accounts
-
Sending verification emails
| For a complete picture on how you can manager users, see the Management API. |
Set up a client
Setting up a client follows generally the same process whether it’s for a first-party, third-party, or management client. This is done via your ReachFive Console. The instructions here cover each type of client setup.
Prerequisites
-
You must have access to your ReachFive Console.
-
You must have a Developer, Manager, or Administrator role.
Instructions
- Get to clients
-
-
Go to .
-
Select New client.
-
Give the client a name and select the Client type from the dropdown menu. Don’t forget to Save your input.
-
- Jump to your client
- Configure the First-party Identity client
-
-
Set your desired scopes by selecting them from the dropdown menu.
-
Choose the Token Endpoint Authentication Method.
The options are Post, Basic, or None. Post is the default and recommended choice. -
Specify the Allowed Origins (CORS). These are the origin URLs allowed to access and use the ReachFive SDK.
-
Specify the Allowed Callback URLs. These are the URLs where the user is taken after authentication.
-
Specify the Token lifetime (in seconds).
-
If desired, set the configuration for the implicit flow, PKCE, ROPC flow, and refresh tokens.
-
You can disable the ROPC flow directly from the ReachFive Console so that the
grant_typeofpasswordis unable to be used on First-party Identity clients.-
Simply click the checkbox next to Disable ROPC Flow.
We offer this ability to disable the flow, because we do not recommend this flow especially for public clients.
-
-
For more on refresh tokens, see here.
-
-
Choose the JWT Algorithm. HS256 is the default option.
-
Specify the Login URL. Users whose authentication failed are sent to this URL.
-
Enable the Attach orchestration token option. This token is detected by the web SDKs and is automatically included in authentication flows.
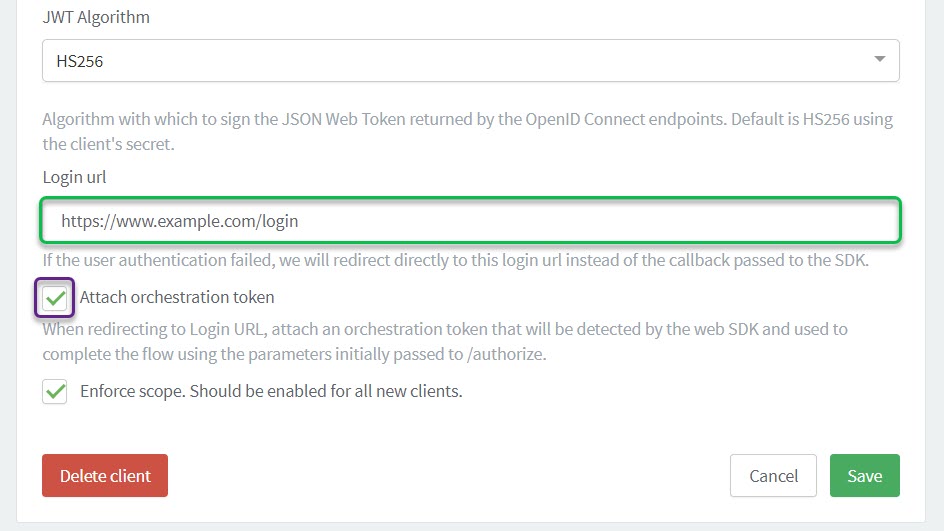
For more, see the dedicated orchestration token page. -
-
If you’re using our Trusted providers feature, enable Allow token exchange from trusted external provider.
-
If needed, check the box for Include SSO cookie in token endpoint response.
-
For new clients, ensure that you check the Enforce scope box.
-
- Configure the Third-party Identity client
-
-
Select the logo that will be displayed in the consent page.
-
Set the Website URL. This is where users will go if they click the logo.
-
Set your desired scopes by selecting them from the dropdown menu.
-
Choose the Token Endpoint Authentication Method.
The options are Post, Basic, or None. Post is the default and recommended choice. -
Specify the Allowed Origins (CORS). These are the origin URLs allowed to access and use the ReachFive SDK.
-
Specify the Allowed Callback URLs. These are the URLs where the user is taken after authentication.
-
Specify the Token lifetime (in seconds).
-
If desired, set the configuration for PKCE and refresh tokens.
More information can be found at Refresh tokens. -
Choose the JWT Algorithm. HS256 is the default option.
-
Optionally, enter a Custom login page if you do not want to use the Hosted Pages login page.
-
- Configure the management client
-
-
Set your desired management permissions by selecting them from the dropdown menu.
Both default and custom scopes are available here. -
Specify the IP addresses that are allowed to call the Management API.
-
Choose the Token Endpoint Authentication Method.
The options are Post, Basic, or None. Post is the default and recommended choice. -
Specify the Allowed Origins (CORS). These are the origin URLs allowed to access and use the ReachFive SDK.
-
Specify the Token lifetime (in seconds).
-
If desired, set the configuration for PKCE.
-
Choose the JWT Algorithm. HS256 is the default option.
-
Retrieve client credentials
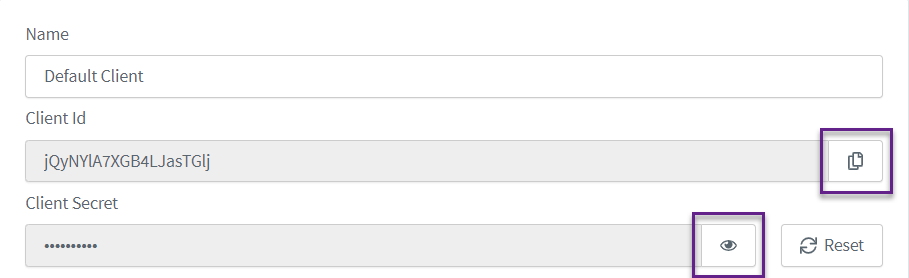
To retrieve the Client ID or Client Secret from one of your existing clients:
-
Navigate to .
-
Choose your desired client.
-
Copy your Client ID.
-
Select the eye to reveal your Client Secret. Once revealed, highlight and copy.
Revoke all user tokens
You can revoke all user tokens from the ReachFive Console. This is applicable to both First-party and Third-party Identity clients, but not Management clients.
This is useful if you want to force all users to re-authenticate for security reasons or potential scope changes.
To revoke all user tokens for a given client:
-
Go to .
-
Select your desired First-party or Third-party Identity client.
-
Scroll to the bottom of the client page and click Revoke tokens.
-
In the dialog:
-
Select the date and time from when you want to remove user tokens. This removes token issued before the date you select.
-
Select the type of tokens you want to revoke. If you select Refresh tokens, Access tokens are also automatically selected.
-
Confirm this is what you want to do and click Send to finish the action.

-
Glossary
- Client
-
The application attempting to access user accounts. It must have a Client ID and a Client Secret.
- Client ID
-
A public identifier for apps. This is public-facing information.
- Client Secret
-
The secret that corresponds to the Client ID. This is known by the application only. It must be kept confidential.
It is critical that developers never include their Client Secret in public apps.