Getting Started

This page guides you on getting started with ReachFive’s Core SDK and includes the following sections:
Browser compatibility
The Core SDK is compatible with the latest versions of:
|
Internet Explorer is no longer supported as of the 17 August, 2021. It has been deprecated by Microsoft. |
Install ReachFive
To install the ReachFive client, you need to obtain your ReachFive domain as well as your Client ID. These are found on the ReachFive Console. After that, you’ll just need to paste the code snippet from Create ReachFive Client into your application or directly in a webpage (CDN).
There are two steps:
Get Domain and Client ID
Prerequisites
-
You must have access to the ReachFive Console.
-
You must have a Developer, Manager, or Administrator role.
Instructions
-
Log in to your ReachFive Console.
-
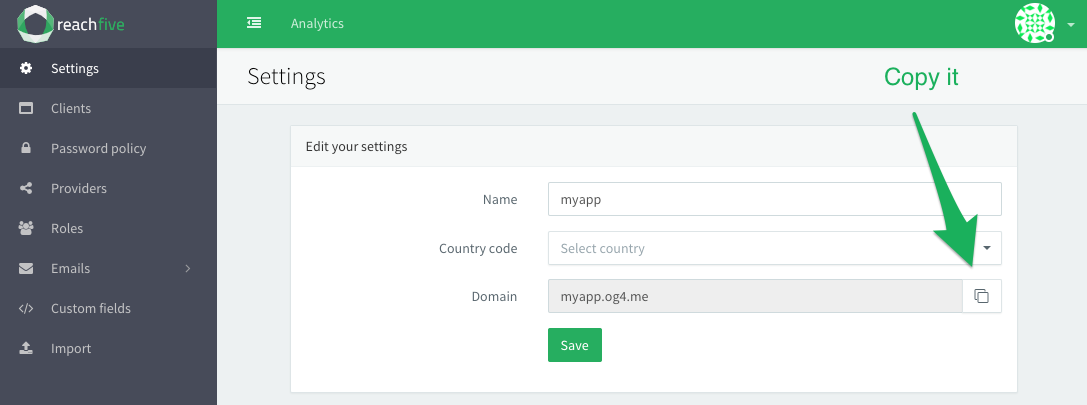
Go to Settings.
-
Copy your ReachFive domain.
-
Go to .
-
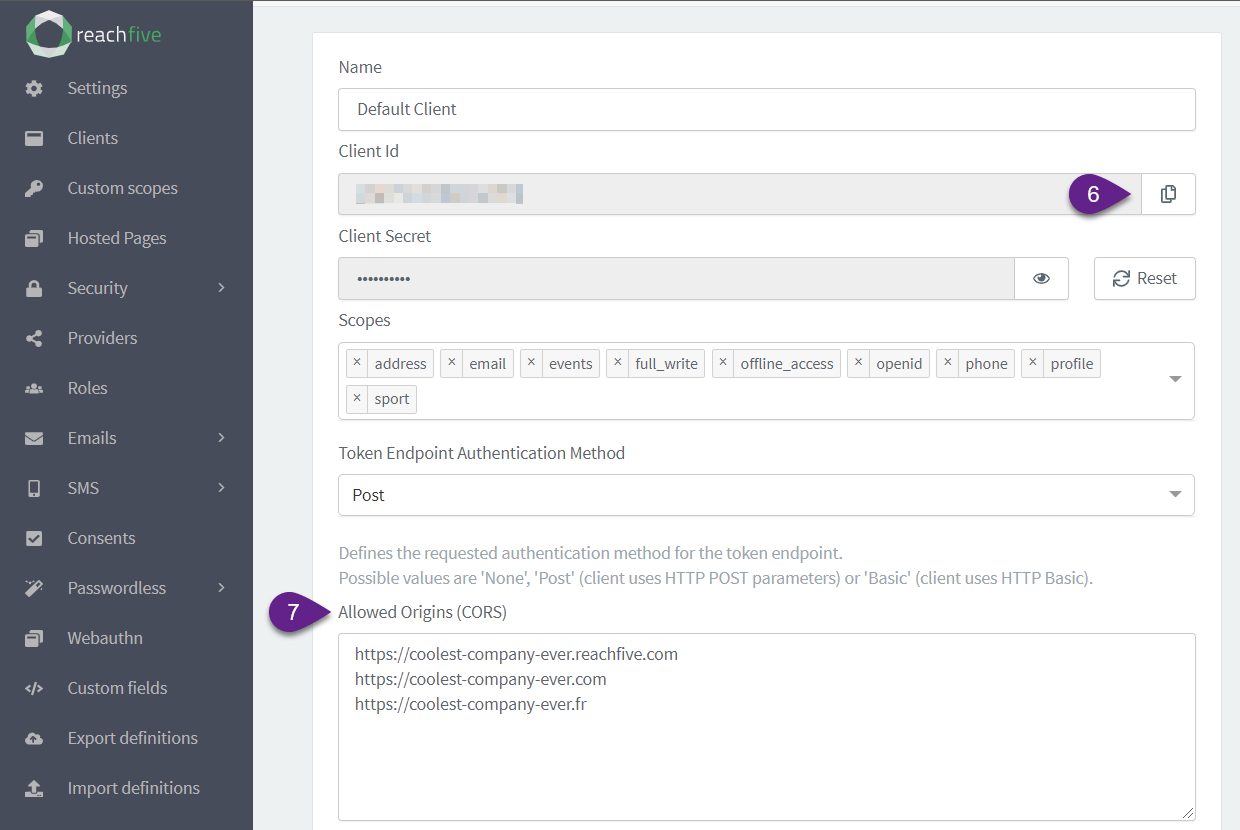
Create a New Client or select an existing client.
-
Copy the desired Client Id you wish to use in your application.
Make sure to keep this handy when you create the ReachFive client. -
Under Allowed Origins (CORS), add all URLs that will use the ReachFive Core SDK.
Create ReachFive Client
You can use Node or the CDN to create a ReachFive client.
CDN vs Node
You can choose to call ReachFive’s SDK libraries with either Node or a Content Delivery Network (CDN).
| Option | Notes | ||
|---|---|---|---|
CDN |
Using the CDN approach allows you to make the calls directly in a page without the need for Node or server-side code. |
||
Node |
Using the Node approach means you want to make the libraries available to your entire ecosystem.
Prerequisites: |
-
Install the latest release of ReachFive from npm using the following command:
npm install @reachfive/identity-core -
Copy the following code snippet into your application. See the descriptions below for more details.
import { createClient } from '@reachfive/identity-core'; (1)

const DOMAIN        = 'Here paste your ReachFive domain'; (2)
const CLIENT_ID     = 'Here paste your ReachFive client ID'; (2)

const client = createClient({ (3)
    // Required parameters
    domain: DOMAIN, (2)
    clientId: CLIENT_ID, (2)
    // Optional parameters
    language: 'Here paste a language code', (4)
    locale: 'fr-FR', (5)
    webAuthnOrigin: RELYING_PARTY_ID (6)
});
1 Import the createClientmethod from the@reachfive/identity-corenpm package.2 Use your DOMAINandCLIENT_IDthat you got from the ReachFive Console.3 Use the createClientmethod to initialize a ReachFive client.4 If you want to provide a language, paste the language code. This will override the language detected in the browser by ReachFive via the user’s locale. See supported languages. 5 Optional parameter where fr-FRis the locale and the value is automatically added in theCustom-Localeheader parameter.6 This is the domain to which passkeys are bound. This can be the root domain or the subdomain. Once bound to a domain, it can be used on subdomains but not other full domains. Example: Using the Relying Party ID of
example.comallows the use of credentials onhelp.example.comfor example, but not on a different full domain likeexample.fr. In this case, customers would need a common login page for passkeys for varying full domains like the stated example here.
Copy the following code snippet into your application. See the descriptions below for more details.
const DOMAIN        = 'Paste your ReachFive domain here'; (1)
const CLIENT_ID     = 'Paste your ReachFive Client ID here'; (1)

<script src="https://cdn.jsdelivr.net/npm/@reachfive/identity-core@x.y.z/umd/identity-core.min.js"></script> (2)

const client = reach5.createClient({ (3)
    // Required parameters
    domain: DOMAIN,
    clientId: CLIENT_ID,
    // Optional parameters
    language: 'Paste language code here', (4)
    webAuthnOrigin: 'Paste your Relying Party ID here' (5)
});| 1 | Use your DOMAIN and CLIENT_ID that you got from the ReachFive Console. |
| 2 | Replace x.y.z with the version you require or simply use @latest for the latest version. |
| 3 | Use the createClient method on the reach5 global variable to initialize a ReachFive client. |
| 4 | If you want to provide a language, paste the language code. This will override the language detected in the browser by ReachFive via the user’s locale.
|
| 5 | This is the domain to which passkeys are bound.
This can be the root domain or the subdomain.
Once bound to a domain, it can be used on subdomains but not other full domains.
Example: Using the Relying Party ID of |
Test drive the Core SDK
So you have successfully installed ReachFive and you want to test it out before dropping it into your application.
In this brief tutorial, we test out the ReachFive client to make sure all is functioning properly. We will create a very simple application that leverages your recently-installed ReachFive client so you can see it in action.
See the video below for a sneak peek at your super simple test-drive in action.
Prerequisites
-
You must have access to the ReachFive Console.
-
You must have a Developer, Manager, or Administrator role.
-
You must have a code editor or IDE such as Visual Studio Code or IntelliJ.
-
You must have npm installed.
-
You must have installed the ReachFive
@reachfive/identity-corenpm package.If you haven’t, download it now:
npm install @reachfive/identity-core
Instructions
-
Create a folder called
test-drivein your desired location. -
Create a new file called
package.jsonin yourtest-drivefolder and copy the following into that file:{ "name": "test-drive", "version": "1.0.0", "description": "test-drive", "main": "index.js", "scripts": { "start": "parcel index.html", "test": "echo \"Error: no test specified\" && exit 1" }, "author": "", "license": "ISC", "dependencies": { "@reachfive/identity-core": "^1.20.1", "parcel-bundler": "^1.12.5" } } -
From the root of your
test-drivefolder, run:npm installThis installs the dependencies listed in the package.jsonfile. -
Create a new file called
index.htmlin yourtest-drivefolder and copy the following into that file:<!DOCTYPE html> <html> <head> <meta charset="utf-8" /> <meta http-equiv="X-UA-Compatible" content="IE=edge"> <title>Test Drive ReachFive</title> <meta name="viewport" content="width=device-width, initial-scale=1"> <link href="https://cdn.jsdelivr.net/npm/bootstrap@5.0.0-beta3/dist/css/bootstrap.min.css" rel="stylesheet" integrity="sha384-eOJMYsd53ii+scO/bJGFsiCZc+5NDVN2yr8+0RDqr0Ql0h+rP48ckxlpbzKgwra6" crossorigin="anonymous"> </head> <body> <script src="core.js"></script> (1) <h1 style="text-align: center; margin: 25px;">My Super Simple ReachFive Sandbox</h1> <div style="width: 50%; margin: auto;"> <form id="signup-form" onsubmit="signup(event)"> (2) <div class="mb-3"> <label for="exampleInputEmail1" class="form-label">Email address</label> <input type="email" name="email" class="form-control" placeholder="Email" aria-describedby="emailHelp"> (3) <div id="emailHelp" class="form-text">We'll never share your email with anyone else.</div> </div> <div class="mb-3"> <label for="exampleInputPassword1" class="form-label">Password</label> <input type="password" name="password" class="form-control" placeholder="Password"> (3) </div> <div class="input-group mb-3"> <span class="input-group-text" id="basic-addon1">@</span> <input type="givenName" class="form-control" placeholder="Name" name="givenName" aria-label="Username" aria-describedby="basic-addon1"> (3) </div> <button type="submit" class="btn btn-primary">Submit</button> </form> </div> </body> </html>1 Calls the core.jsfile that you will create in the next step.2 The signupmethod is trigged on theonsubmitevent.3 The form fields. -
Create a new filed called
core.jsin yourtest-drivefolder and copy the following into that file:import { createClient } from '@reachfive/identity-core' (1) const DOMAIN = 'YOUR_REACHFIVE_DOMAIN' (2) const CLIENT_ID = 'YOUR_REACHFIVE_CLIENTID' (3) const client = createClient({ (4) domain: DOMAIN, clientId: CLIENT_ID }) function signup(e) { e.preventDefault(); var form = document.getElementById('signup-form') var formData = new FormData(form) client.signup({ (5) data: { (6) email: formData.get('email'), password: formData.get('password'), givenName: formData.get('givenName') }, auth: { (7) redirectUri: 'http://localhost:1234' } }) .then(() => { (8) console.log("Signup") client.on('authenticated', authResult => { console.log("Listening 1") console.log("authResult1", authResult) }) }) .catch(console.log) return } window.signup = signup1 Imports the ReachFive client. 2 Your ReachFive domain.3 Your ReachFive client_id.4 The client variable (which contains your domainandclient_id).5 Calls the signup method. 6 Sets the sign up data for the sign up form; in this case, email,password, andname.7 Uses the auth options; in this case, sets the redirectUritohttp://localhost:1234.8 The response for the signupmethod. Here, we simply log to the console. Typically, you would receive token information.See the authResultobject for more details. -
From the root of your
test-drivefolder, run:npm run start -
Open your browser to
localhost:1234. -
Sign up a new user.
-
Go to your ReachFive Console.
-
Navigate to to see your newly-created user.