Getting Started
MavenCentral 11.0.0
This page introduces you to the Android SDK documentation for version 11.0.0 of the 11.x release.
Requirements
The ReachFive SDK supports Android SDK from API Level 21 (Android version 5.0 Lollipop).
To initialize the ReachFive client:
-
You need a Domain URL and Client ID.
-
You must whitelist all available domains where the ReachFive SDK will be used.
This is done in the Allowed Origins (CORS) field of your ReachFive console, in the Settings menu.
Installation
ReachFive SDKs are published to Maven Central as separate modules.
allprojects {
    repositories {
        mavenCentral() (1)
    }
}| 1 | Add mavenCentral as a repository location in your project’s top-level build.gradle file. |
| Below are installation instructions for each module. |
SDK Core
Core contains all the main tools and interfaces, and the methods related to authentication.
Add the following line to your app/build.gradle, replacing x.y.z with the latest SDK version:
dependencies {
    implementation "co.reachfive.identity:sdk-core:x.y.z"
}
The following permissions are required to communicate with the ReachFive servers. Add them to the AndroidManifest.xml file.
<manifest>
    <uses-permission android:name="android.permission.ACCESS_NETWORK_STATE"/>
    <uses-permission android:name="android.permission.INTERNET" />
    <uses-permission android:name="android.permission.USE_CREDENTIALS" />
</manifest>
Proguard rule exception
If you have set minifyEnabled true in your Android build, you need to add the following Proguard rule in order to make an exception for certain ReachFive SDK models.
Add the following rule to your proguard-rules.pro file to prevent ReachFive API models from being obfuscated:
-keep class co.reachfive.identity.sdk.core.models.** {*;}Web-based Flows
If you intend on using non-native social login providers (SDK WebView) or our orchestrated web login flow (Core), then you must properly configure your application accordingly.
| Check out the Web-Based Flows guide for more details. |
SDK WebView
This module uses a Custom Tab to authenticate users through a social login provider configured in your account; it enables all providers that are supported by ReachFive.
For mobile contexts, you must whitelist reachfive://${clientId}/callback using your ReachFive identity client ID.
This URL scheme is the default callback URL and is used to request a token when implementing the SDK Webview.
|
Add the following line to your app/build.gradle, replacing x.y.z with the latest version:
dependencies {
  implementation "co.reachfive.identity:sdk-webview:x.y.z"
}
You must also add the following activity into the AndroidManifest.xml file:
<activity
    android:name="co.reachfive.identity.sdk.core.RedirectionActivity"
    android:screenOrientation="portrait"
  android:exported="true">
  <intent-filter>
    <action android:name="android.intent.action.VIEW" />
    <category android:name="android.intent.category.DEFAULT" />
    <category android:name="android.intent.category.BROWSABLE" />
    <data
      android:host="@string/reachfive_client_id" (1)
      android:pathPrefix="@string/reachfive_path" (1)
      android:scheme="@string/reachfive_scheme" (1)
      tools:ignore="AppLinkUrlError" />
  </intent-filter>
</activity>| 1 | Define reachfive_client_id, reachfive_path, and reachfive_scheme in the <resources> section of your settings.xml file.
settings.xml example
|
Release build considerations
When building your app in release mode, the WebView used by the ReachFive Android SDK may encounter issues due to code shrinking and obfuscation performed by R8, Android’s default optimization tool. These issues can manifest as the WebView failing to load content or authentication flows not completing.
To ensure the WebView functions correctly in release builds, consider the following:
-
Verify Proguard/R8 Rules:
The ReachFive Android SDK includes Proguard rules to prevent critical classes and methods from being removed or obfuscated. Ensure that your app’s
proguard-rules.profile does not conflict with these rules. -
Disable R8 Full Mode:
If you encounter issues with the WebView in release builds (e.g., blank WebView or failed authentication), it may be due to R8’s aggressive optimizations in full mode. As a workaround, you can disable R8’s full mode by adding the following line to your app’s
gradle.propertiesfile:android.enableR8.fullMode=false
Facebook Native Provider
This module uses the Facebook native SDK to provide a better user experience.
| Refer to the Meta Connect (Facebook Login) guide to create your Facebook application. |
-
Add the following lines to your
app/build.gradle, replacingx.y.zwith the latest version:dependencies { implementation "co.reachfive.identity:sdk-facebook:x.y.z" } -
Add the line below into your
string.xmlresource file with your Facebook application ID:<resources> <string name="facebook_app_id">FACEBOOK_APPLICATION_ID</string> (1) <string name="facebook_client_token">FACEBOOK_CLIENT_TOKEN</string> (1) </resources>1 Get your App ID and Client Access Token from your Facebook Developer account. -
Then add these lines into the
AndroidManifest.xmlfile:<manifest> <meta-data android:name="com.facebook.sdk.ApplicationId" android:value="@string/facebook_app_id" /> (1) <meta-data android:name="com.facebook.sdk.ClientToken" android:value="@string/facebook_client_token" /> (1) <activity android:name="com.facebook.FacebookActivity" android:configChanges="keyboard|keyboardHidden|screenLayout|screenSize|orientation" android:label="@string/app_name" /> </manifest>1 Get your App ID and Client Access Token from your Facebook Developer account.
Configure Google native provider
This module uses the Google native SDK to provide a better user experience.
-
Add the following line to your
app/build.gradle, replacingx.y.zwith the latest version:dependencies { implementation "co.reachfive.identity:sdk-google:x.y.z" } -
Set up your Google Cloud Console project.
-
You need to create an Android client ID with information about your application.
To create the Android client ID, you must provide the SHA-1 certificate fingerprint of your application. You can get the SHA-1 fingerprint using the
keytoolutility:For more details, see Client authentication.
-
-
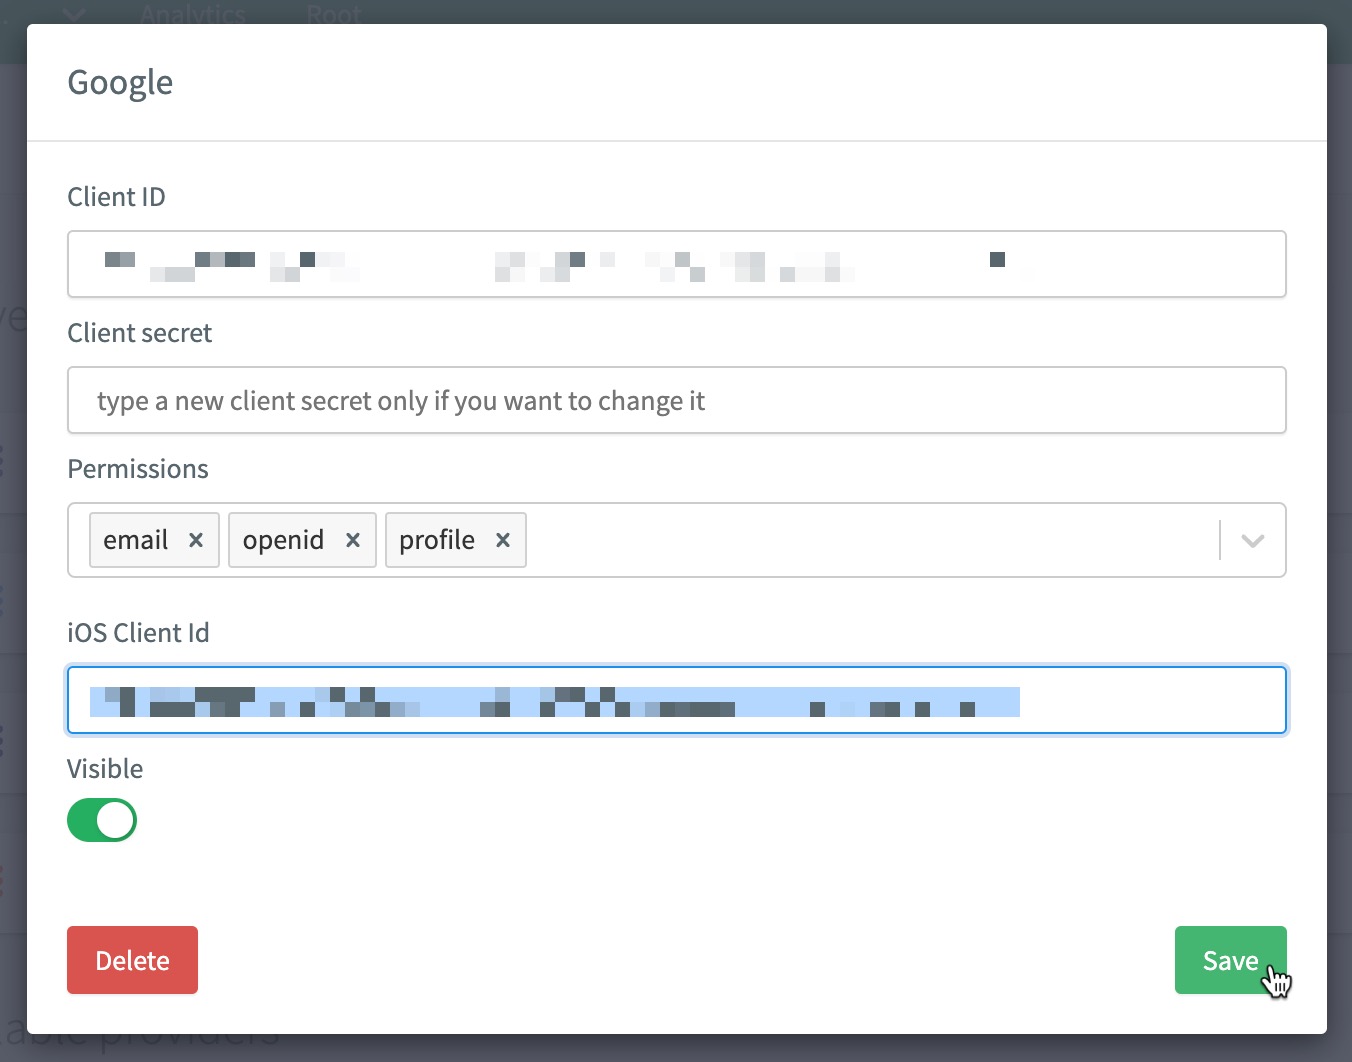
Create a Web client ID.
This corresponds to the usual Google Provider configuration in the ReachFive Console. You will need to copy the Client ID and Client Secret from this Web client and paste them into your ReachFive Console settings for the Google provider. If already configured, you can skip this step.
-
On the ReachFive Console, go to , and select Google.
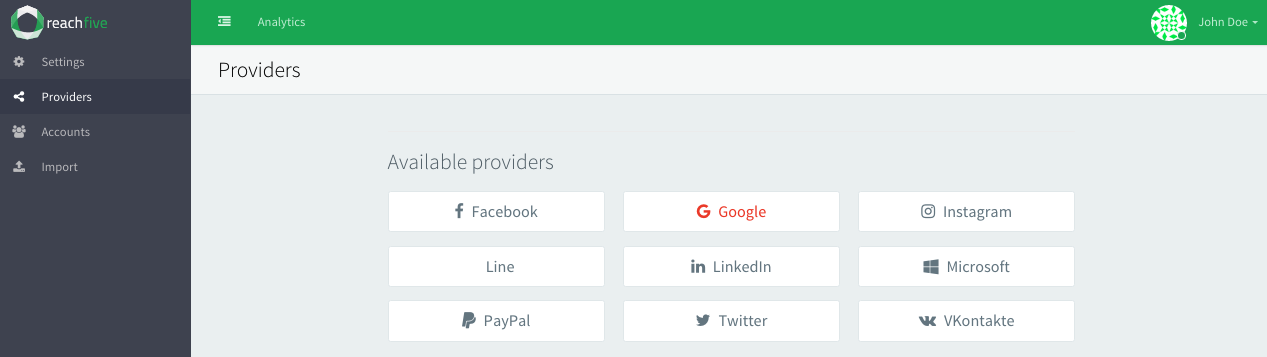
-
Paste your credentials and add all available permissions.
-
If using iOS, you should also paste in your Google Client ID.
Example:
1234567890-abcdefg.apps.googleusercontent.comFor more, see iOS SDK: Google native provider.If you have multiple brands or subsidiaries using Google or even if you have different use cases, you can add them as variants within the ReachFive Console.
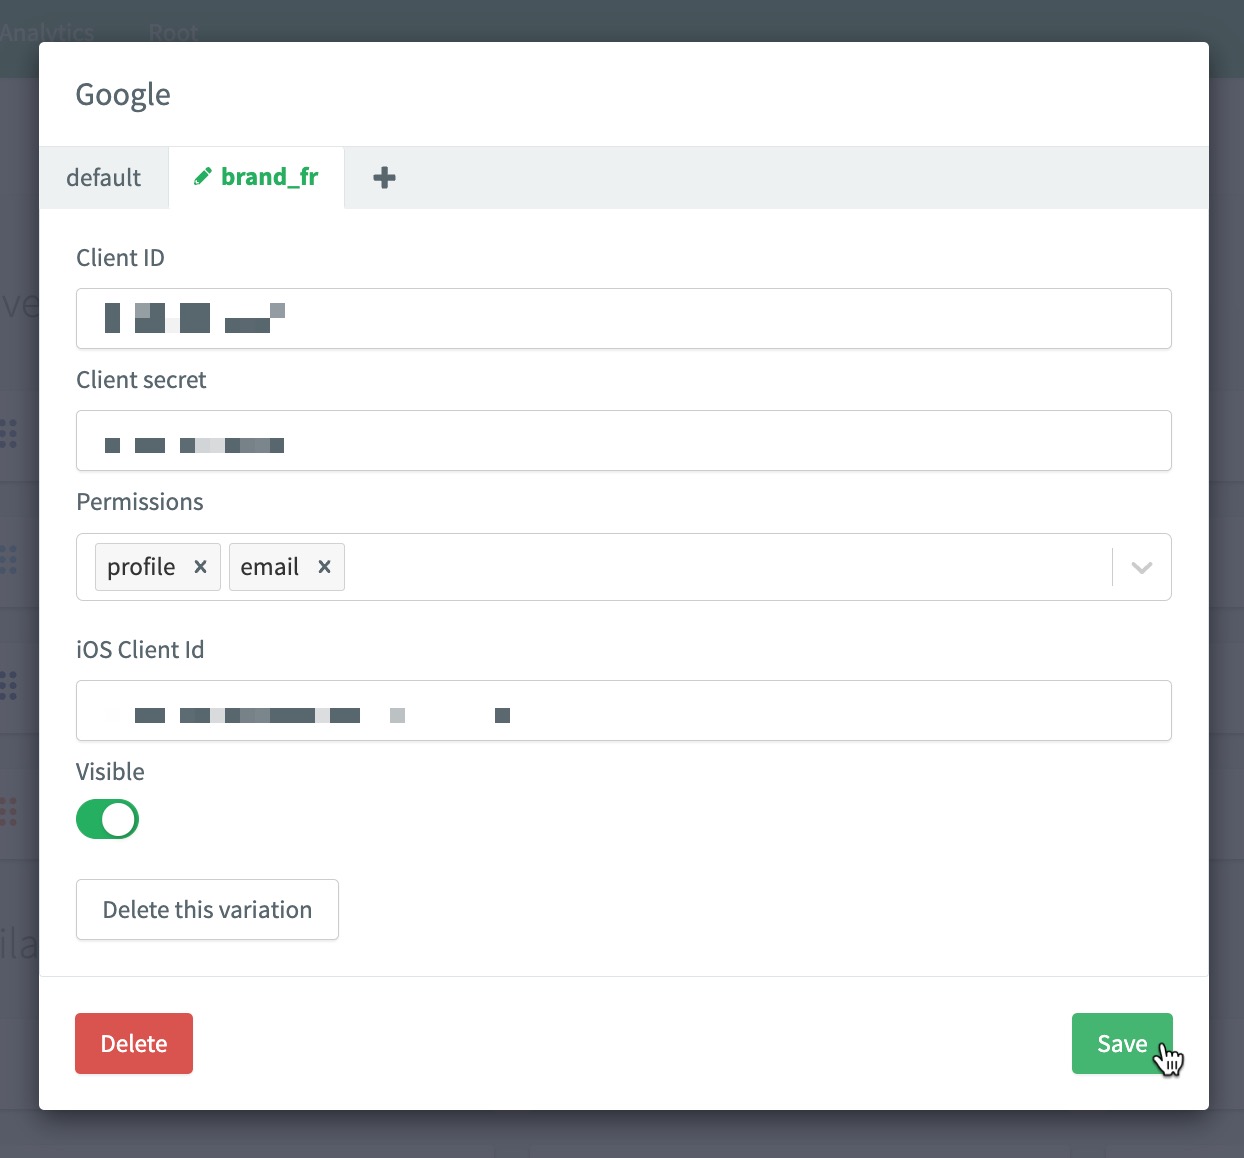
-
Don’t forget to Save your input..
-
WeChat Connector
This module uses the WeChat Android SDK to provide a better user experience.
- Minimum Android SDK version
-
8.2.0
| Refer to the WeChat Connect guide to create your WeChat application. |
-
Add the following lines to your
app/build.gradle, replacingx.y.zwith the latest version:dependencies { implementation "co.reachfive.identity:sdk-wechat:x.y.z" } -
Add these lines into the
AndroidManifest.xmlfile:<manifest> ... <queries> <package android:name="com.tencent.mm" /> (1) </queries> ... </manifest>1 Required Tencent is the parent company of WeChat.
Client Initialization
In all the code example below, the ReachFive client is instantiated and stored in a variable named client.
import android.content.Intent
import android.os.Bundle
import android.util.Log
import android.view.Menu
import android.view.MenuItem
import android.widget.Toast
import androidx.appcompat.app.AppCompatActivity
import co.reachfive.identity.sdk.core.ReachFive
import co.reachfive.identity.sdk.core.SdkConfig
import co.reachfive.identity.sdk.core.models.AuthToken
import co.reachfive.identity.sdk.core.models.ProfileSignupRequest
import co.reachfive.identity.sdk.facebook.FacebookProvider
import co.reachfive.identity.sdk.google.GoogleProvider
import co.reachfive.identity.sdk.webview.WebViewProvider
import io.github.cdimascio.dotenv.dotenv
import kotlinx.android.synthetic.main.activity_main.*

class MainActivity : AppCompatActivity() {
    private const val TAG = "YourApp"

    // The ReachFive client
    private lateinit var client: ReachFive

    val DOMAIN    = "Your ReachFive domain"
    val CLIENT_ID = "Your ReachFive client ID"
    val SCHEME    = "Your ReachFive scheme" (1)
    val originWebAuthn = "Your Relying Party ID" (2)

    override fun onCreate(savedInstanceState: Bundle?) {

        // The configuration parameters needed by the ReachFive client
        val sdkConfig = SdkConfig(domain = DOMAIN, clientId = CLIENT_ID, scheme = SCHEME)

        // The list of the social providers needed by your application
        val providersCreators = listOf(GoogleProvider(), FacebookProvider(), WebViewProvider()) (3)

        client = ReachFive(
            sdkConfig = sdkConfig,
            providersCreators = providersCreators, (3)
        )

        // Initialize the ReachFive client
        client.initialize({
            // Success
        }, {
            // On failure, log the error message returned by the ReachFive client
            Log.d(TAG, "ReachFive init ${it.message}")
        })

        // Load the social providers
        client.loadSocialProviders( (3)
            applicationContext,
            success = { providers -> /* update the providers you display */},
            failure = { Log.d(TAG, "Loading providers failed ${it.message}") }
        )
    }
}| 1 | The SCHEME should follow the format: reachfive://${clientId}/callback. It is a URI for native apps. |
| 2 | For passkeys only: The Relying Party ID which is the domain to which passkeys are bound. Once bound to a domain, it can be used on subdomains but not other full domains. See Relying Party ID for more details. |
| 3 | Social providers should be initialized even in an activity where the user is expected to be authenticated already. This ensures a proper logout is performed if the user has signed in through a social provider. |