Meta Connect (Facebook Login)
This page explains how to create a Meta Developer (Facebook Login) application and connect it to your ReachFive account. To use Meta (Facebook Login) as a social login provider, you need your App ID and App Secret from your Meta app. You’ll then copy these keys into your ReachFive settings.
This page is meant to guide you through connecting your Meta Developer (Facebook Login) application with ReachFive. It is not a complete guide on using the Meta side. We try our best to ensure the page is up-to-date. However, for comprehensive instructions for Meta (Facebook Login), you’ll need to refer to their documentation which is quite comprehensive.
Key takeaways:
-
This page explains where to go to get the necessary information to connect Meta Facebook Login to ReachFive.
-
This page explains what information you need to pass to Meta Facebook Login that ReachFive needs to connect to it.
-
This page gives explicit instructions for the ReachFive Console on what is needed to connect Facebook Login to ReachFive.
-
This page does not give detailed instructions for within the Meta Facebook Login application, but rather gives generally what you need.
When configuring the app in Meta/Facebook, you will be prompted for a valid OAuth redirect URI. You must set it to:
https://<REACHFIVE_DOMAIN>/login/callback (1)| 1 | Where <REACHFIVE_DOMAIN> is your domain. |
Please note that because Facebook Login is a product within a Meta application, you may see Meta and Facebook used interchangeably through this guide.
Facebook data
This is the collectable data for Meta Connect (Facebook Login).
Public data
-
User ID (
id) - A unique identifier for the user.
-
Name (
name) - The user’s full name.
-
First Name (
first_name) - The user’s first name.
-
Last Name (
last_name) - The user’s last name.
-
Profile Picture (
picture) - The user’s profile image.
User consent needed
-
Email Address (
email) - The user’s primary email address.
-
Birthday (
birthday) - The user’s date of birth.
-
Friends List (
friends) - The list of friends who also use the app.
-
Hometown (
hometown) - The user’s hometown.
-
Current Location (
location) - The user’s current location. dd
-
Gender (
gender) - The user’s gender.
Create a Meta application
Prerequisites
-
You must have a Meta Developer account.
-
You must have the all Facebook (Meta) features enabled on the ReachFive Console.
Check with your ReachFive administrator if you are unsure if the features are enabled.
Instructions
-
Go to Meta for Developers.
-
Log in with your account and create a new app by following the instructions provided here.
Meta app validation
| You select the type of application when you Create a Meta application. If you need different features and permissions, consider trying a new application type. |
- Sub-sections
Consumer app type
Typically, you will need a Consumer app type when integrating your application/site, Meta, and ReachFive. See the list below for up-to-date information regarding Consumer apps and their associated permissions and features.
The Consumer app type (may be displayed as Build Connected Experiences in the selection modal) is for apps that integrate consumer-related products like Facebook Login to provide app users with a more personalized experience.
- Available Features
None
Make your app public
There is a section within your Meta (Facebook Login) application where you’ll need to make the application "go live". Please follow the instructions provided here for details on publishing a Meta (Facebook Login) application.
Configure Facebook (Meta) as Provider on ReachFive
Prerequisites
-
You must have a Meta Developer account.
-
You must have the all Facebook (Meta) features enabled on the ReachFive Console.
Check with your ReachFive administrator if you are unsure if the features are enabled.
Instructions
- On Meta for Developers
-
-
Go to .
-
Copy your App ID and App Secret.

-
- On your ReachFive Console
-
-
Go to .
-
Choose Facebook.
-
Paste your Facebook App ID and App Secret.
This is labelled as Client ID and Client Secret in the ReachFive Console. -
Add at least the following Permissions. See available
permissionsfor more.-
public_profile -
emailThe data that you collect requires user consent. Users can choose to mask their email address. In this case, you would not get the user’s email address. However, the profile will still be created on ReachFive but with no email address associated with the user.
-
-
Activate Facebook as a ReachFive social provider by toggling the Visible slider to Green.
If you have multiple brands or subsidiaries using Facebook or even if you have different use cases, you can add them as variants within the ReachFive Console.
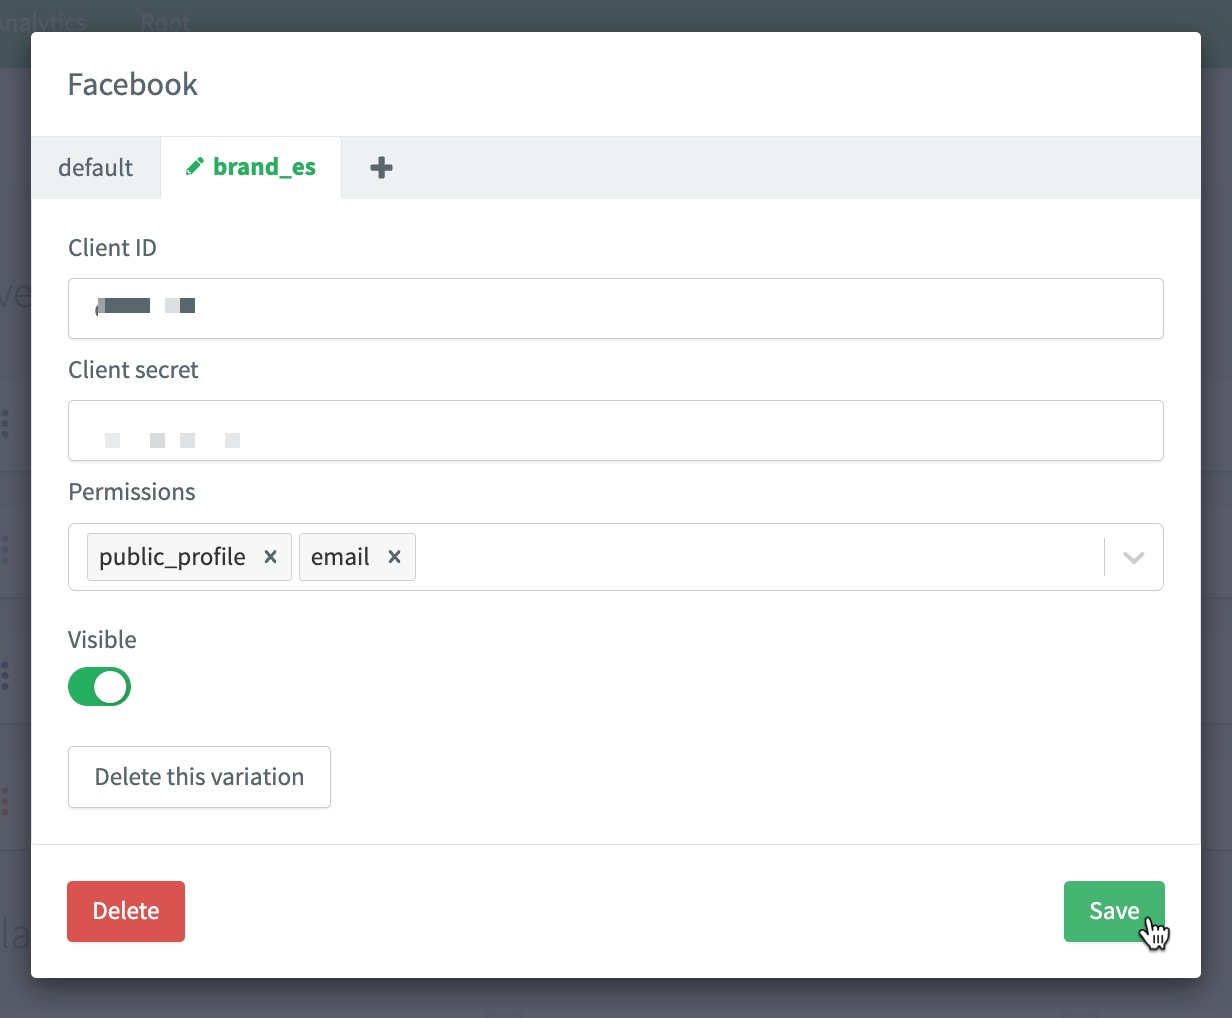
-
Don’t forget to Save your input.

-
Wrap-up
That’s all you need to integrate your ReachFive account with your Facebook application.
| You only need to have your Facebook Application validated to go live. |
|
If you want to implement your own button instead of the widget, follow the Facebook Guidelines. For best practices about Login permissions read the Facebook recommendations. |