Microsoft Customer Insights
ReachFive integrates seamlessly with Microsoft Customer Insights (CI). By leveraging ReachFive’s export definition feature, you can export user identities from the ReachFive Console as well as export user events using the user events endpoint.
This brief tutorial guides you on exporting user profiles from the ReachFive Console and importing those identities into Microsoft Customer Insights, enabling you to better analyze your customer base by leveraging the power of ReachFive combined with Microsoft Customer Insights.
| You can also follow these same steps to export Export user events or Export user consent logs. |
- There are three sequential steps in this tutorial
Typically, you want to have Microsoft CI poll data via an API. Therefore, this tutorial is purely to show you one way you might use ReachFive data with Microsoft CI.
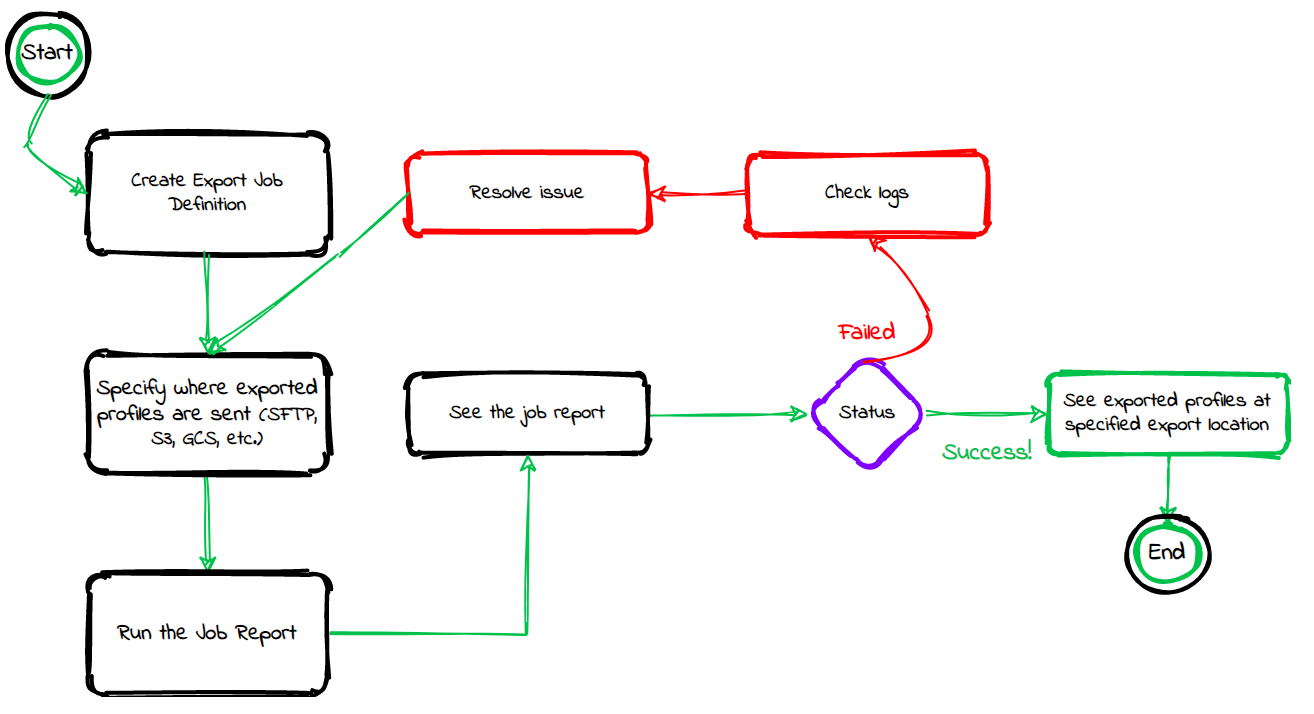
Exporting user profiles
The instructions below guide you step-by-step in exporting your users from the ReachFive Console. The visual below shows you a high-level flow of the process.
Prerequisites
-
You must have access to the ReachFive Console.
-
You must have a Developer, Manager, or Administrator role.
-
You must have the Export Jobs feature enabled.
Instructions
The instructions below apply to both creating and editing an export job definition.
|
If editing an existing export job, be sure to select the |
-
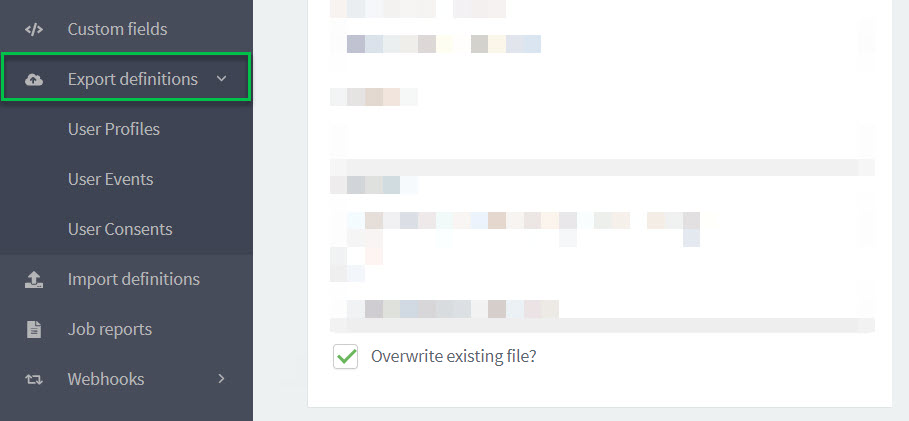
Go to .
-
Select New definition.
-
Under General, give the export job a name and description. Don’t forget to Enable the job.
-
Under Destination, choose the protocol you wish to use to export the file.
-
Specify the Server host for the secure FTP site.
-
Specify the Server port.
-
Under Authentication method, choose the authentication method type:
Username and password:
-
Enter the Username for the server.
-
Enter the Password for the server.
OpenSSH:
-
Enter the Username for the server.
-
Enter the OpenSSH private key.
example-----BEGIN ENCRYPTED PRIVATE KEY----- MIIBpjBABgkqhkiG9w0BBQ0wMzAbBgkqhkiG9w0BBQwwDgQI5yNCu9T5SnsCAggA MBQGCCqGSIb3DQMHBAhJISTgOAxtYwSCAWDXK/a1lxHIbRZHud1tfRMR4ROqkmr4 kVGAnfqTyGptZUt3ZtBgrYlFAaZ1z0wxnhmhn3KIbqebI4w0cIL/3tmQ6eBD1Ad1 nSEjUxZCuzTkimXQ88wZLzIS9KHc8GhINiUu5rKWbyvWA13Ykc0w65Ot5MSw3cQc w1LEDJjTculyDcRQgiRfKH5376qTzukileeTrNebNq+wbhY1kEPAHojercB7d10E +QcbjJX1Tb1Zangom1qH9t/pepmV0Hn4EMzDs6DS2SWTffTddTY4dQzvksmLkP+J i8hkFIZwUkWpT9/k7MeklgtTiy0lR/Jj9CxAIQVxP8alLWbIqwCNRApleSmqtitt Z+NdsuNeTm3iUaPGYSw237tjLyVE6pr0EJqLv7VUClvJvBnH2qhQEtWYB9gvE1dS BioGu40pXVfjiLqhEKVVVEoHpI32oMkojhCGJs8Oow4bAxkzQFCtuWB1 -----END ENCRYPTED PRIVATE KEY-----
-
-
Specify the Path where the import file is located.
- For example
-
<serverhost>/path-to-file/file.csv. - Example w/variables
-
<serverhost>/path-to-file/file-{{datetime}}.csvSee Export path variables for more details.
-
Specify the URL for the S3 bucket.
-
Specify the name Bucket.
-
Enter the Region for the server.
-
Enter the Access key for AWS.
-
Enter the Secret key for AWS.
-
Specify the Path where the export file is to be sent.
- For example
-
<serverhost>/path-to-file/file.csv. - Example w/variables
-
<serverhost>/path-to-file/file-{{datetime}}.csvSee Export path variables for more details.
-
Specify the Project ID for the Google Cloud Storage.
-
Specify the App name.
-
Enter the User name for the server.
-
Specify the name Bucket.
-
Enter the Credentials in JSON format.
-
Specify the Path where the export file is to be sent.
- For example
-
<serverhost>/path-to-file/file.csv. - Example w/variables
-
<serverhost>/path-to-file/file-{{datetime}}.csvSee Export path variables for more details.
-
-
Still under Destination, if desired, click Overwrite existing file.
-
When you check the box, the existing file is replaced by the new file. Data in the existing file is completely replaced.
-
If left unchecked, the new data is added to the existing file.
-
-
Under Schedule, if desired, use a Quartz scheduler for scheduling the job.
-
Under File format, select the file format type you wish to export. This will be either JSONL or CSV.
For the purposes of this tutorial, choose CSVas your file format.-
Define the fields to include in the export. You can include all attributes of the user profile data model including custom fields and consents.
-
Choose the Encoding standard for your JSONL file. This is either
UTF-8orISO-8859-1.If using
ISO-8859-1, note that there are limitations around characters that it encodes. It is primarily for Western European languages. It is not intended for non-Western European languages and also has limitations for certain digital characters and symbols. When a character is unrecognized, it is replaced with a question mark,?in the export. If in doubt, chooseUTF-8.
All fields of the user profile data model will be exported, including consents and custom_fields.-
Define the columns to include in the export. You can include all attributes of the user profile data model including custom fields and consents.
You can drag and drop the fields to sort the order in which you want the columns displayed as part of the export job.
-
Choose the Encoding standard for your CSV file. This is either
UTF-8orISO-8859-1.If using
ISO-8859-1, note that there are limitations around characters that it encodes. It is primarily for Western European languages. It is not intended for non-Western European languages and also has limitations for certain digital characters and symbols. When a character is unrecognized, it is replaced with a question mark,?in the export. If in doubt, chooseUTF-8. -
Enter your Delimiter. The default is
;. -
Enter your Quote char. The default is
". -
Enter your Escape character. The default is
\.
The data for custom fields that contain the multipletype (such astags) are separated by the sameDelimiterthat is configured in the job definition. -
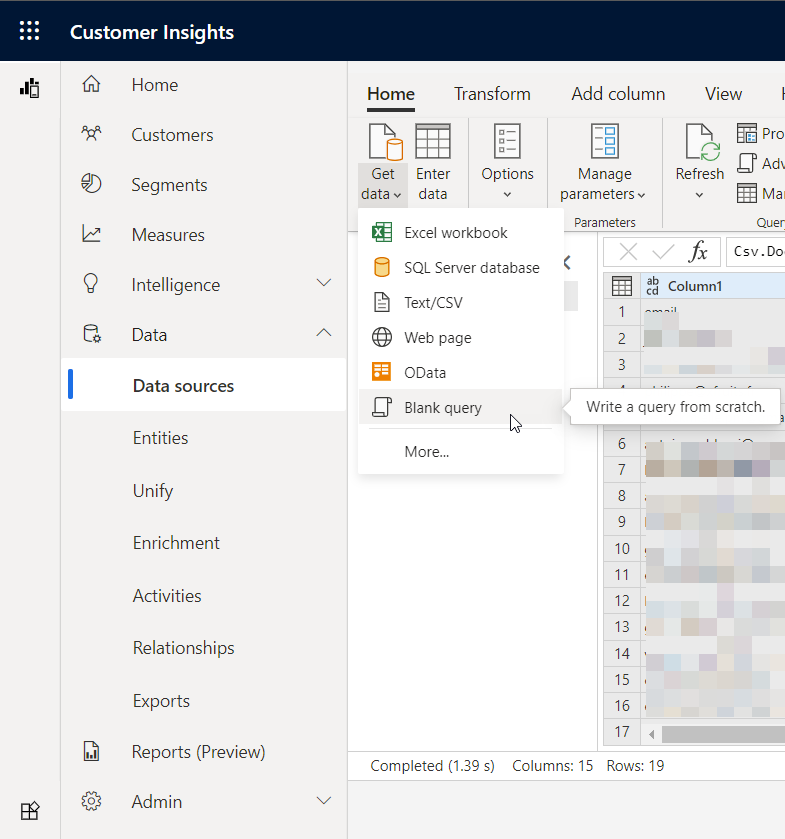
Importing data to Microsoft Customer Insights
Now that you have exported the user data from ReachFive in the first step, you can import the CSV file into Microsoft Customer Insights account.
Prerequisites
-
You must have a Microsoft Customer Insights account.
-
You must have a
 account.
 -
You must have exported your user identities from the ReachFive Console as a
CSVfile.
Instructions
With your freshly-exported CSV file to hand…
Prepare the file
| For the sake of this tutorial, we are using a Google Spreadsheet to import into Customer Insights. However, as noted in the introduction, you will likely poll data via an API. This is for display purposes only. |
-
Open Google Sheets.
-
Go to and import your
CSVfile. -
Update the share settings to ensure that anyone with the link has Editing privileges.
See the Google help article for assistance if needed. -
Copy the URL of your Google Sheet.
-
Replace
edit#gid=<gid>withexport?format=csv&gid=<gid>.
|
Your final URL before importing to Microsoft CI should be: |
- Next Import the file
-
Import the file
-
Log in to your Microsoft Customer Insights account.
-
Go to .
-
Select Add data source.
-
Choose Import data.
-
Enter the name of your data source. Click Next.
-
-
Choose the Web API option.
-
Paste the
URLfrom your spreadsheet.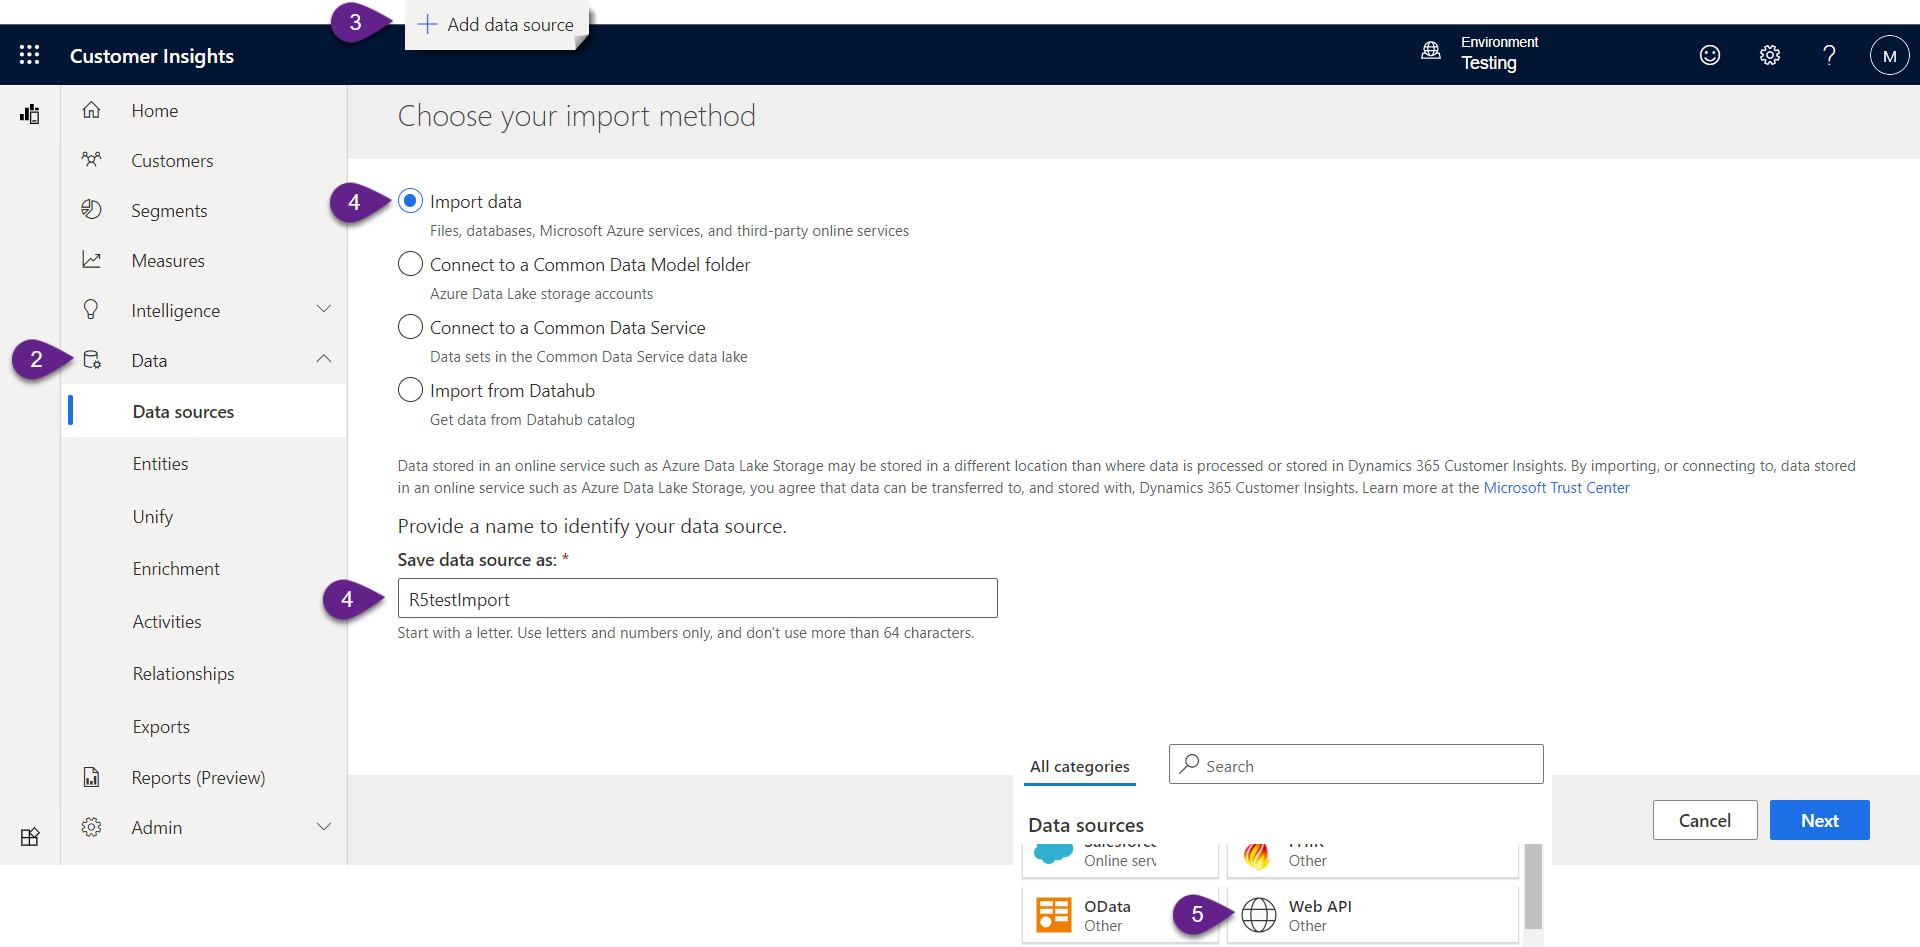
-
-
Make sure the encoding and delimiter match those from your exported ReachFive CSV file in the file preview.
-
Click Transform data.
Transforming the data
If your CSV file has certain characters such as underscores, hyphens, or full-stops (periods) between column names, you may need to clean those columns in order to best leverage Customer Insights.
Prerequisites
-
You must have a Microsoft Customer Insights account.
-
You must have already imported your user identities into Microsoft CI.
Instructions
-
Create a new .
-
Copy the following code into that query:
let CleanColumns = (TableColumnFix as table) as table=> let ListObjectWithCleaningLogic = let Source = TableColumnFix, DemoteHeaders = Table.DemoteHeaders(Source){0}, CreateTableFromRecord = Record.ToTable(DemoteHeaders), DuplicateOldColumnNames = Table.DuplicateColumn(CreateTableFromRecord, "Value", "Value - Copy"), RenameColumns = Table.RenameColumns(DuplicateOldColumnNames,{{"Value", "OldColumnName"}, {"Value - Copy", "NewColumnName"}}), TrimmedText = Table.TransformColumns(RenameColumns,{{"NewColumnName", Text.Trim, type text}}), ReplacePoints0 = Table.ReplaceValue(TrimmedText, ".", "", Replacer.ReplaceText, {"NewColumnName"}), ReplacePoints1 = Table.ReplaceValue(ReplacePoints0, ",", "", Replacer.ReplaceText, {"NewColumnName"}), ReplacePoints = Table.ReplaceValue(ReplacePoints1, "_", "", Replacer.ReplaceText, {"NewColumnName"}), CleanText = Table.TransformColumns(ReplacePoints, {{"NewColumnName", each Text.Clean(_), type text}}), #"Added Custom" = Table.AddColumn(CleanText, "NestedLists", (_)=> {_[OldColumnName],_[NewColumnName]})[NestedLists] in #"Added Custom", CleanColumnNames = Table.RenameColumns(TableColumnFix,ListObjectWithCleaningLogic) in CleanColumnNames in CleanColumns -
Click Next to validate the query.
-
Copy the name of your newly-created
function. This is typically found on the right of the screen under the Name label. -
Paste the following into the
textareaof your original query.let Source = Csv.Document(Web.Contents("YOUR_GOOGLE_SHEET_URL"), (1) [Delimiter = ";", Columns = 244, QuoteStyle = QuoteStyle.None, Encoding = 65001]), #"NAME" = Table.PromoteHeaders(Source, [PromoteAllScalars = true]), (2) result = CleanColumns(#"NAME") (2) (3) in result1 Sourcemust match your source CSV/Google Sheet import.2 #"NAME"should match the name of your file.3 CleanColumnsmust match the name of your newly-created function.
Export path variables
In some cases, you might want to add meta information to the path of an export file for identification and analysis purposes. With export path variables, you can do just that. Wherever you would like a variable in the path, simply add it to the name of the file as shown here:
<serverhost>/path-to-file/{{datetime}}-file-{{job_execution_id}}.csv (1)| 1 | In this example, {datetime} and {job_execution_id} are inserted as part of the file name as part of the export. |
| The export path variable feature is available for all export types including exporting profiles, user events, and consents. |
Available export path variables
The following variables are available for you to use as part of your export.
-
{{datetime}}is the job execution date in the format ofyyyy-MM-dd HH-mm-ss. -
{{date}}is the job execution date in the format ofyyyy-MM-dd. -
{{time}}is the job execution time in the format ofHH-mm-ss. -
{{*datePattern}}lets you set the date pattern as shown here. -
{{account}}is the name of the account where the export occurred. -
{{job_execution_id}}is the specific id of the export being executed.