Delete user profiles in bulk
You can delete user profiles in bulk by using the Import job definition. Although the import job feature is used, the logic is actually deleting the user profiles. The import job definition handles importing, updating, and in this case, removing unwanted or inactive user profiles. The section below instructs you on how to delete profiles in bulk via the ReachFive Console.
Delete user profiles from console
You may wish to remove unwanted to inactive user profiles from your system. Do this by removing the profiles via the ReachFive Console.
Prerequisites
-
You must have access to the ReachFive Console.
-
You must have a Developer, Manager, or Administrator role.
-
You must have the Import Jobs feature enabled.
Multi-threaded imports
Our import jobs are multi-threaded. This means that many profiles are imported simultaneously. Therefore, it’s important that you ensure all profiles are unique; otherwise, you may get duplicate profiles.
We strongly encourage you to check the following fields to ensure each profile is unique:
-
email -
phone_number(if the SMS feature is enabled) -
external_id -
custom_identifier
See the User Profile for more on these fields.
Instructions
The instructions below apply to both creating and editing an import job definition.
|
If editing an existing import job, be sure to select the |
-
Go to .
-
Select New definition.
-
Under General, give the import job a name and description. Don’t forget to Enable the job.
-
Under Source, choose the protocol you wish to use to import the file.
-
Specify the Server host for the secure FTP site.
-
Specify the Server port.
-
Under Authentication method, choose the authentication method type:
Username and password:
-
Enter the Username for the server.
-
Enter the Password for the server.
OpenSSH:
-
Enter the Username for the server.
-
Enter the OpenSSH private key.
example-----BEGIN ENCRYPTED PRIVATE KEY----- MIIBpjBABgkqhkiG9w0BBQ0wMzAbBgkqhkiG9w0BBQwwDgQI5yNCu9T5SnsCAggA MBQGCCqGSIb3DQMHBAhJISTgOAxtYwSCAWDXK/a1lxHIbRZHud1tfRMR4ROqkmr4 kVGAnfqTyGptZUt3ZtBgrYlFAaZ1z0wxnhmhn3KIbqebI4w0cIL/3tmQ6eBD1Ad1 nSEjUxZCuzTkimXQ88wZLzIS9KHc8GhINiUu5rKWbyvWA13Ykc0w65Ot5MSw3cQc w1LEDJjTculyDcRQgiRfKH5376qTzukileeTrNebNq+wbhY1kEPAHojercB7d10E +QcbjJX1Tb1Zangom1qH9t/pepmV0Hn4EMzDs6DS2SWTffTddTY4dQzvksmLkP+J i8hkFIZwUkWpT9/k7MeklgtTiy0lR/Jj9CxAIQVxP8alLWbIqwCNRApleSmqtitt Z+NdsuNeTm3iUaPGYSw237tjLyVE6pr0EJqLv7VUClvJvBnH2qhQEtWYB9gvE1dS BioGu40pXVfjiLqhEKVVVEoHpI32oMkojhCGJs8Oow4bAxkzQFCtuWB1 -----END ENCRYPTED PRIVATE KEY-----
-
-
Specify the Path where the import file is located.
- For example
-
<serverhost>/path-to-file/file.csv.
You may have to authorize ReachFive’s outgoing IPs to access your SFTP server. For more on this, see Console: Outgoing cluster IPs.
-
Specify the URL for the S3 bucket.
-
Specify the name Bucket.
-
Enter the Region for the server.
-
Enter the Access key for AWS.
-
Enter the Secret key for AWS.
-
Specify the Path where the import file is located.
- For example
-
<serverhost>/path-to-file/file.csv.
-
Specify the Project ID for the Google Cloud Storage.
-
Specify the App name.
-
Enter the User name for the server.
-
Specify the name Bucket.
-
Enter the Credentials in JSON format.
-
Specify the Path where the import file is located.
- For example
-
<serverhost>/path-to-file/file.csv.
-
-
If you are importing files with additional encryption:
-
Select Encrypt.
-
Enter your password that is used as part of the encryption.
-
Specify the number of PBKDF2 iterations you used.
-
-
Under Schedule, if desired, use a Quartz scheduler for scheduling the job.
-
Under File format, select the file format type you wish to import. This will be either JSONL or CSV.
Choose the Encoding standard for your JSONL file.
{
  "external_id": "1",
  "email": "foo@gmail.com"
} \n (1)
{
  "email": "bar@gmail.com",
  "name": "Joe",
  "gender": "M",
  "enroll_email_as_mfa_credential": true, (2)
  "enroll_phone_as_mfa_credential": true, (2)
  "custom_fields": { (3)
      "has_loyalty_card": true
  },
  "consents": { (4)
    "exampleConsent": {
      "date": "2021-11-23T11:42:40.858Z",
      "consent_version": {
        "language": "fr",
        "version_id": 1
      },
      "granted": true,
      "consent_type": "opt-in",
      "reporter": "managed"
    }
  },
  "addresses": [ (5)
    {
      "id": 0,
      "default": true,
      "address_type": "billing",
      "street_address": "10 rue Chaptal",
      "address_complement": "4 étage",
      "locality": "Paris",
      "postal_code": "75009",
      "region": "Île-de-France",
      "country": "France",
      "recipient": "Matthieu Winoc",
      "phone_number": "0723538943",
      "custom_fields": {
        "custom_field_example": "custom_field_example_value",
        "custom_field_example_2": 42,
      }
    }
  ]
}
1 Each profile must separated by a line feed character ( \n).2 Enrolling email for MFA (only registers if identifier is verified). 3 Import custom_fieldsas an object containing a series of fields.4 Import consentsas an object or as a flattened field with the formatconsents.<consent>.<parameter>shown below.... "consents.cgu.date": "2021-09-03T19:08:01Z", "consents.cgu.granted": true, "consents.cgu.consent_version.version_id": 2, "consents.cgu.consent_version.language": "fr", "consents.cgu.consent_type": "opt-in", "consents.cgu.reporter": "managed" ...5 You can import addresses including custom address fields. -
Choose the Encoding standard for your CSV file.
-
Enter your Delimiter. The default is
;. -
Enter your Quote char. The default is
". -
Enter your Escape character. The default is
\.
email,name,gender,custom_fields.has_loyalty_card,consents.newsletter.consent_type,consents.newsletter.granted,consents.newsletter.date,consents.newsletter.reporter,addresses.0.custom_fields.custom_field_example bar@gmail.com,Joe,M,true,opt-in,true,2018-05-25T15:41:09.671Z,managed,custom_field_example_value -
-
If desired, enable the End Job Notification Webhook.
For more information on the webhook, see the End Job Notification Webhook page.
-
Under Advanced:
-
Select Delete for the Type.
-
If desired, select testing mode.
-
If you would like to retain the Lite profiles associated with the deleted user(s), select Keep lite profile.
-
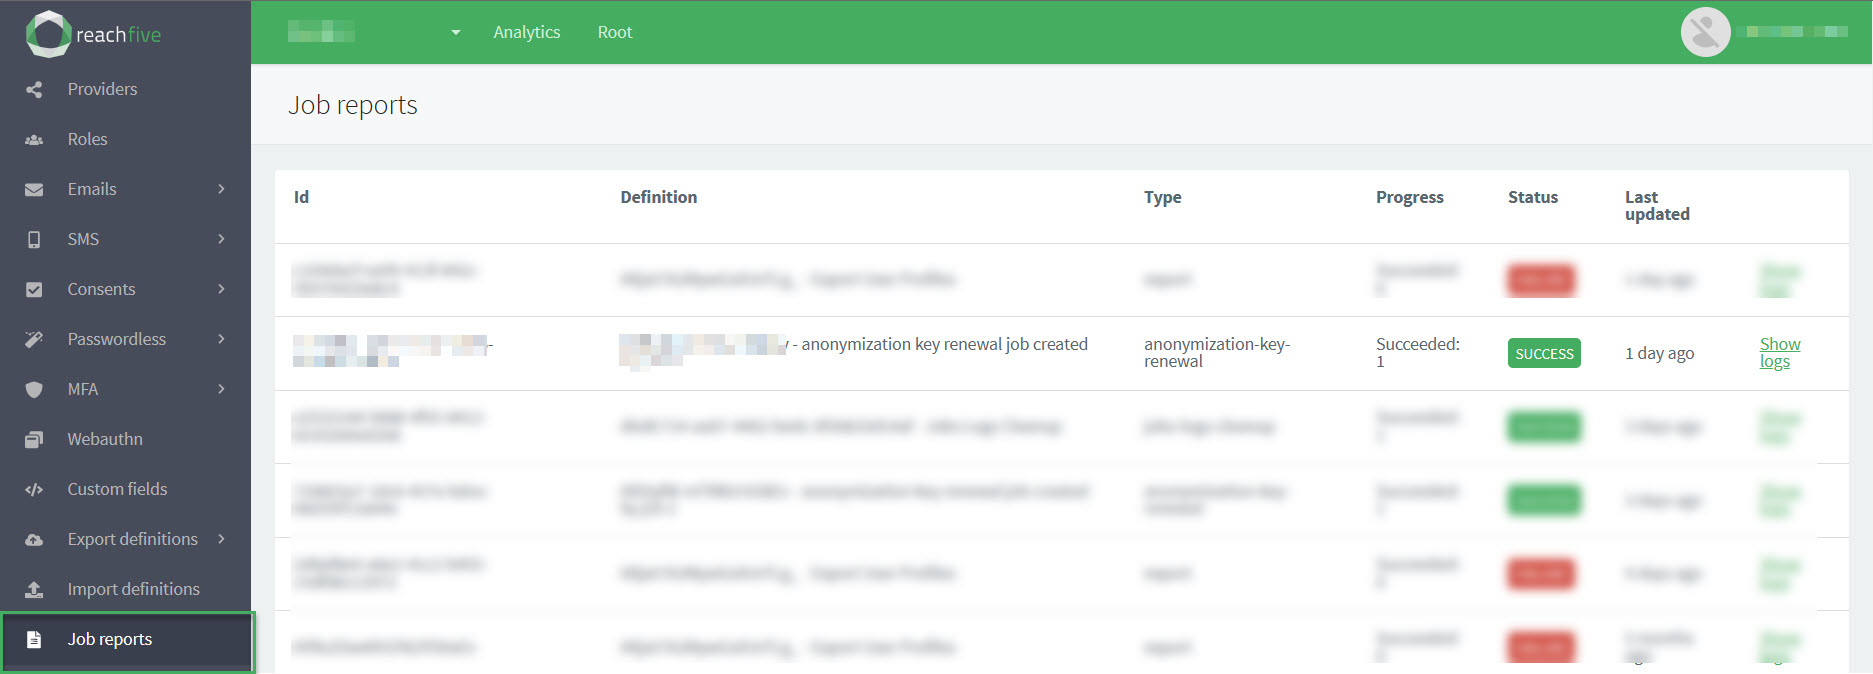
Job reports
Job reports provide a snapshot of the different export and import jobs that you have run.
Information such as the id, a definition, the job type, the progress of the job, the job’s status, and when the job was last run is provided for you so you can get a quick look at the latest jobs.
To find more information about the job, you can view the job logs.
Only job reports run in the last 6 months are displayed on the Job reports page in the ReachFive Console. Older jobs are automatically deleted.
To access job reports:
-
Open your ReachFive Console.
-
Go to .
The following statuses are possible for job reports:
-
FAILURE which indicates the job has failed. Check out the logs for more information.
-
WAITING which indicates the job has yet to finish.
-
SUCCESS which indicates the job was successfully run.
For Bulk deletion jobs:
-
If the job runs completely through the file, the Succeeded: <N> and Failed: <N> displayed on the Job Report accurately reflect the number of profiles successfully deleted and those that weren’t successfully deleted.
-
If the job is stopped during execution, the Succeeded: <N> and Failed: <N> displayed on the Job Report are only an estimate of the number of profiles successfully deleted and those that weren’t successfully deleted.
-
Filter job reports
You can filter job reports from the ReachFive Console. Filtering the reports helps you more easily find the job report you’re looking for. The job report filters offers several ways to filter as shown in the table below. This includes setting a timeframe and how the results are displayed.
To filter job reports:
-
Open your ReachFive Console.
-
Go to .
-
Click Filters in the top right corner.
-
Enter your desired filters in the dialog.

Filter Description Job IDFilter by a specific job ID that has been run.
This filter is particularly useful when you need to look into a specific job. Perhaps, you obtained the ID through logs or need to investigate further.
Job definition IDFilter by a job definition ID.
This filter is useful when you want to look at a particular job definition. Maybe, you want to see how often it’s been run, or why a specific job definition is succeeding or failing.
Job typeFilter by the type of job such as export or import.
The job type filter is good to filter out only the type of jobs you want to see.
Job statusFilter by the status of the job.
Statuses-
SUCCESS -
RUNNING -
WAITING -
WAITING_CANCELLATION -
CANCELED -
FAILURE
-
-
If desired, select a timeframe by clicking From for the starting date and To for the end date.
-
Choose the Order of how you want your results displayed.
-
Click Apply.
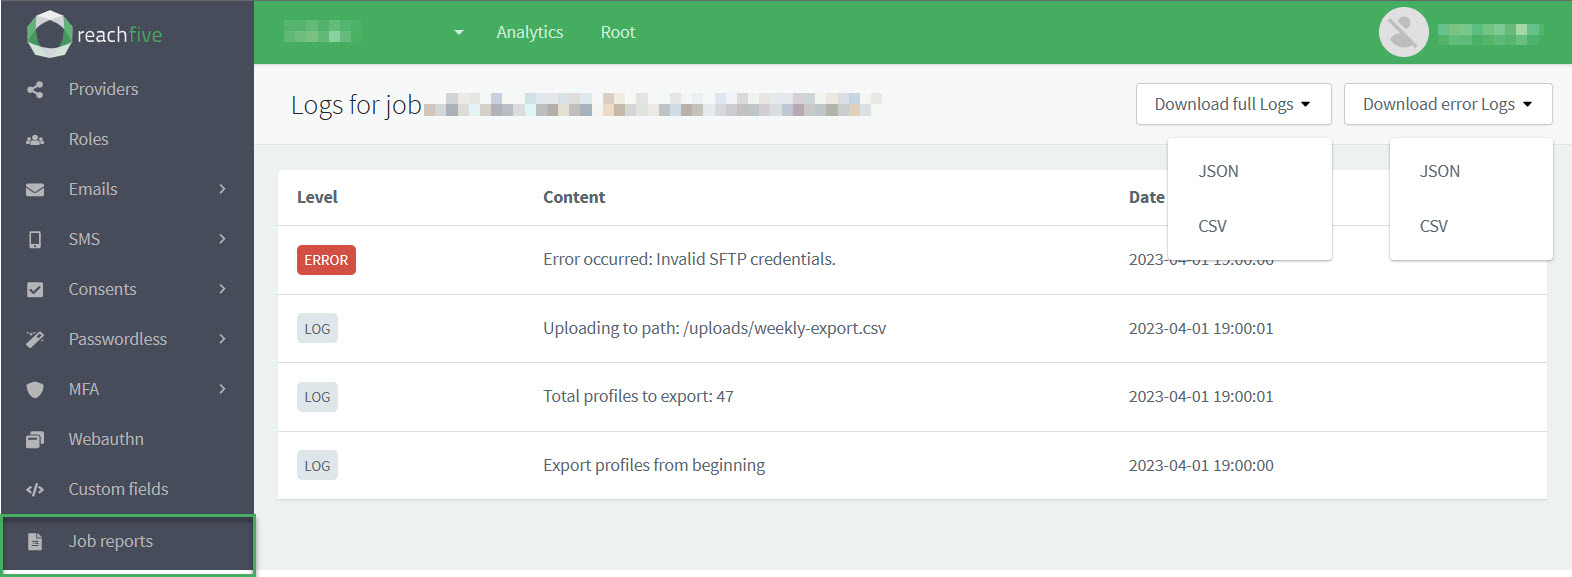
Job logs
To view more information on the job itself or download the logs, click Show logs found on the far right hand side of the table.
In the job logs, you can see the information Level, the Content of the information, and the Date on which it occurred.
| Category | Description | Example |
|---|---|---|
Level |
Denotes the level of the log information. possible values
|
ERROR |
Content |
Gives a description of the log information. |
"Export profiles from beginning" |
Date |
The timestamp for the log information. |
|
Download logs
You can download full logs or just the errors by clicking the desired dropdown and choosing the format for the download.
{"Level":"LOG","Content":"Export profiles from beginning","Date":"2023-04-02T00:00:00.899Z"}
{"Level":"LOG","Content":"Total profiles to export: 47","Date":"2023-04-02T00:00:01.296Z"}
{"Level":"LOG","Content":"Uploading to path: /uploads/weekly-export.csv","Date":"2023-04-02T00:00:01.298Z"}
{"Level":"ERROR","Content":"Error occurred: Invalid SFTP credentials.","Date":"2023-04-02T00:00:06.991Z"} (1)| 1 | Shows where the ERROR occurred and gives details on what the error was. |
Export logs
You can export logs for a specific job using the Management API’s Export job logs endpoint.